Showing posts with label Revelations. Show all posts

Wednesday, September 3, 2008

And It's a Cereal Too ...

Pin It


Today's card project was created using stamps and designer papers from Close to My Heart ... and some vintage ephemera from my vast collection. Well, it's more like half-vast ...

I kill me ...

ONward Hoarding-Card-Makers!

I stamped the distressed fishes on a scallop border cut from a page in a book published in 1894, then embossed with Distress embossing powder.

The sentiment was stamped on Vintage Cream card stock with "Timber Brown" Staz-On, cut out with a Nestie and mounted with dimensionals on the brown card stock.

I looped natural jute around the card, and adhered it to my card using silver prong studs. I tied more jute around the rows, frayed the ends, and finis!

Okay, I made a startling math discovery today. Frankly, it was pretty startling to find myself even thinking about math, but ... Okay, here it is:


  1. "Squirrels" x "Hoard" = Nuts (a x b = c)
  2. "Stampers" x "Hoard" = Nuts (a x b = c)
Now I remember next to nothing about math but I DO remember being taught that math is a science, an exact science. Uh oh, the DH can't be right:

  1. Me: "OMiGosh, I love that new BasicGrey collection; I simply HAVE to have it!!"
  2. DH: "You're gonna buy MORE paper? You don't even use the paper you already have!"
  3. Me: "But this is different paper; I don't have any of this paper!"
  4. DH: "Okay. Tell me what you're goin' to do with THIS particular paper?
  5. Me: "Umm, well, I'm not sure right now but I'll definitely use it. A lot!"
  6. DH: "No, you won't, you'll hoard it."
  7. Me: "Ummm ... "
  8. DH: "You're nuts."

Well, we may be nuts, but we're cute, right?!?

Thanks so much for spending part of your busy day with me; you rock!!

~Hugs,

  • Card Stock: Papertrey Ink
  • Designer Paper: "Perfect Day" by Close to My Heart
  • Stamps: "Relax" Collection by Close to My Heart
  • Ink: Distress Embossing Ink; "Timber Brown" Staz-On; Fluid Chalk Ink
  • Accessories: Silver Brads; Natural Jute; Silver Prong Studs; Distress Embossing Powder
  • Tools: Die-Cut Machine; Nestabilities Dies; Slit Punch; Threading Water Punch; Scrap Fusion PA; Dimensionals
  • Other: Vintage Ephemera

Tuesday, July 1, 2008

Predicting the Future ... with Greeting Cards!

Pin It


Well, not exactly. But this is the very last card project I created before coming down with pneumonia. So, I mailed it to myself! And guess what? I feel better!

Ipso facto: a handmade, stamped greeting card will definitely make you feel better. And will give you fresh breath and strong, shiny hair, too!

And the iron lung reference (see post below), was a joke. I am, and have been, breathing just fine all by my lonesome. Anyway, I'm terribly sorry for the misunderstanding ... I DO have a strange sense of humor, huh?!?

This cute little card was created using an ancient (1996) matchbox stamp from Crafty One/Limited Edition, and a slide drawer-type match box:

I stamped my image on Funky Vintage designer papers from Making Memories, then cut everything out, gluing the "comforter" on to the match box. I colored my Teddy bear with Koh-I-Noor pencils, blending with Gamsol and a paper stump.

I stamped my sentiment on Bazzill card stock, cut some mats using rectangle and heart-shaped Nestie dies in the Cuttlebug, and tied some funky fiber around the fold.

Here's a peak at the goodies tucked inside the drawer:

The tiny teddy and the little book are part of the stamp but you could certainly add more fun little things to make your little sickie smile. Like penicillin ...

Now that I'm startin' to feel like my middle-aged old self again, I expect to get back into the swing of things soon: participating in my sweet friend Allison's weekly challenges, lots of e-ing with my pal, Annapurna, return-comment blurfing, admiring everything Jewels creates, stalking SCS, and visiting your blog.

THAT should keep me outta trouble for a while!

Thanks for spending part of your busy day with me; you rock!

~Hugs,


Card Stock: Bazzill, DCWV; Designer Paper: Making Memories, Funky Vintage "Lizzie Collection"; Stamps: Matchbox Marvels by Limited Edition/Sentiment: Papertrey Ink; Dye Ink: Distress Ink "Black Soot" by Ranger Industries; Color Medium: Koh-i-Noor Woodless Pencils; Fiber: Unknown; Die Cut Machine by Provo Craft; Dies by Spellbinder's; Gamsol by Gamblin; Paper Stump: Creative Mark; Adhesive: ATG 714 and "The Ultimate" by Api

Thursday, June 26, 2008

Reports of My Death Have Been

Pin It

Somewhat Exaggerated ...

So, hello there boys and girls! Hope all is well in your corner of the world.

My keepers have decided to free me from my P.I.L (Portable Iron Lung) for a bit .. monthly maintenance and what not, so I thought I'd post a quick note here to say hello there!

When last we met here, I was happily (and healthily, lol), enjoying a visit with the darlin' DG-K's. Here's a pix for you to 'oooooohhh,' and 'ahhhhhhhhhhhhh,' and 'aren't they cute?' over:


Anyway, next thing I knew, I was confined to bed (as if I could have stayed awake even if I wanted to), spiking fevers, and coughing my brains out. Literally: what a mess!

So, at the moment, even with all this fancy doctorin' stuff, no one can tell me what's wrong. The best explanation (or my favorite anyway), is this: It's a hybrid bronchial pneumonia. Hybrid, that sounds kewl, right?!?

I'm not sure when I'll post again but I'm so grateful for all the well-wishes and 'hey, there's' I've received from you. And lots o' special thanks to Anne and Jewels ... they know why.

And I'm totally jonesin' for my studio so I expect to be creatin' stuff again soon!!!

Oh. And the "Portable" Iron Lung Machine? Not so portable ...

~Hugs,

Sunday, June 8, 2008

WARNING ... I Stumbled Upon a Spoiler with NO Alert!!

Pin It


Well, I'm completely bummed!!! Here's why: a member of the stamping/card making/paper crafting community has posted the ending of the new Sex and the City movie!

I've been eagerly anticipating seeing SATC, and this 'news' really spoils the movie for me. Unfortunately, it hasn't arrived yet in my Cinema 1-147 ... or trust me, I'd have already seen it and I prolly wouldn't have had this (over) reaction, LOL.

But, I can't help but wonder (as Carrie would say), why someone would elect to do this NOW?!? I mean, the movie has only been released in the U.S. for a WEEK ... well, 9 days to be exact.

I can see throwing the movie spoiler on your blog say, four or five months after the movie opened. Not nine freaky-deaky days after it opens!


So, because I unintenionally had the movie ruined for me, I'm tryin' to save you from the same fate ... call it a Public Service Announcement. If you don't want to inadvertently discover the ending of SATC, you might want to say away from online forums, groups, and chat rooms till you get a chance to see the flick yourself.

And, if knowing the ending to the most highly anticipated movie since SATC went off the air doesn't bother you, well, then ... never mind ... and peace out.

Hey, I'll recover! I hope you're enjoying a nice Sunday with your beloved stamps family and thanks so much for visiting!

~Hugs,

Saturday, June 7, 2008

Tally Me Bananas? Umm, About $20 Each ...

Pin It


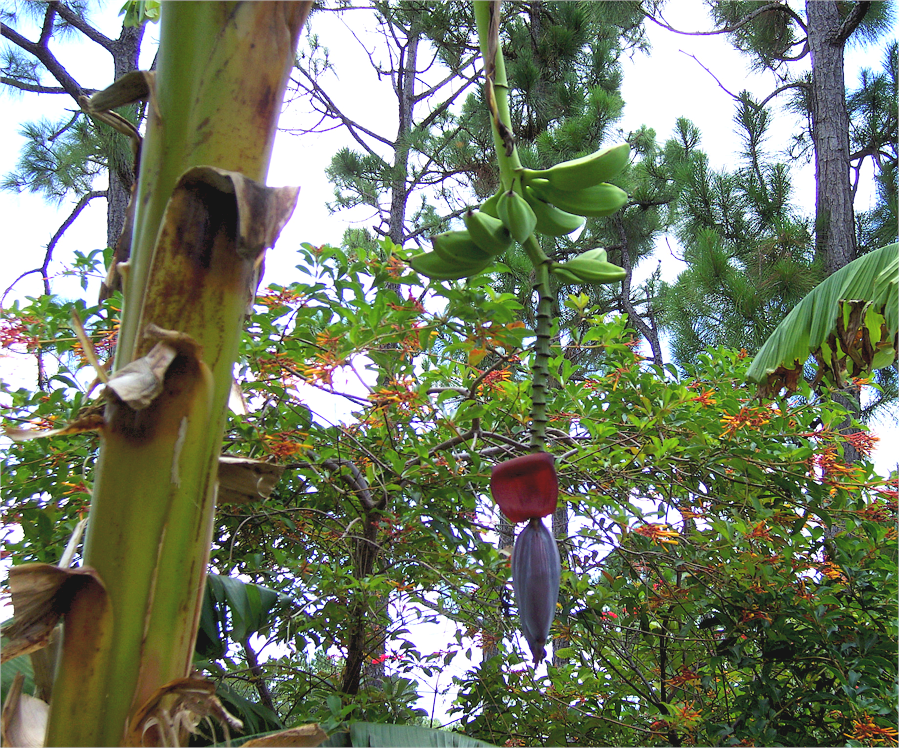
Due to popular demand ... okay, three people: a photograph of the Banana-Tree-That-Wouldn't-Bear-Fruit-Bearing-Fruit!

If you've been following along, I mentioned in an earlier post that our barren 8 year old banana tree had finally set fruit. After lakes full of water, a landfill's worth of compost, and enough banana tree fertilizer to feed a small country of banana trees, we finally have ... let's see ... looks like ten bananas!

I'm hoping that we get more, but using the current count, the bananas on this tree will have cost us approximately $200.00 ... or, $20.00 each. These better be some fine bananas!

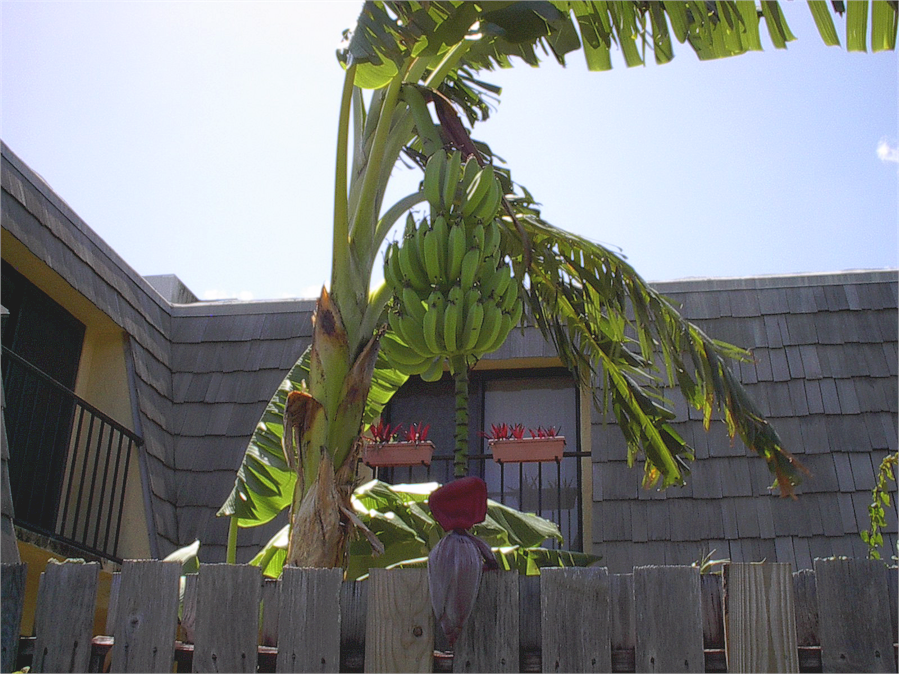
Now, here's a photo of my banana tree's Momma:

WoWZa! Look at that big o'le bunch of bananas!

This tree was grown in Boynton Beach in about 3 square feet of soil ... well, sand ... and no compost, or fertilizer, had ever been added to this giant's diet.

We go strictly by the book on this banana-farming thang and I get 10 lousy bananas?!?

Well, no matter what surprises the fates have in store for me, I'm guessin' that banana tree farming isn't goin' be one of 'em!

Hope you're having a great weekend and thanks for stopping by to laff and point at my banana tree.

~Hugs,


EDITED TO ADD: That bush in the background with the red and orange flowers? That's hummingbird bait. Yah, I'm gettin' a lot of them, too ...

Friday, May 16, 2008

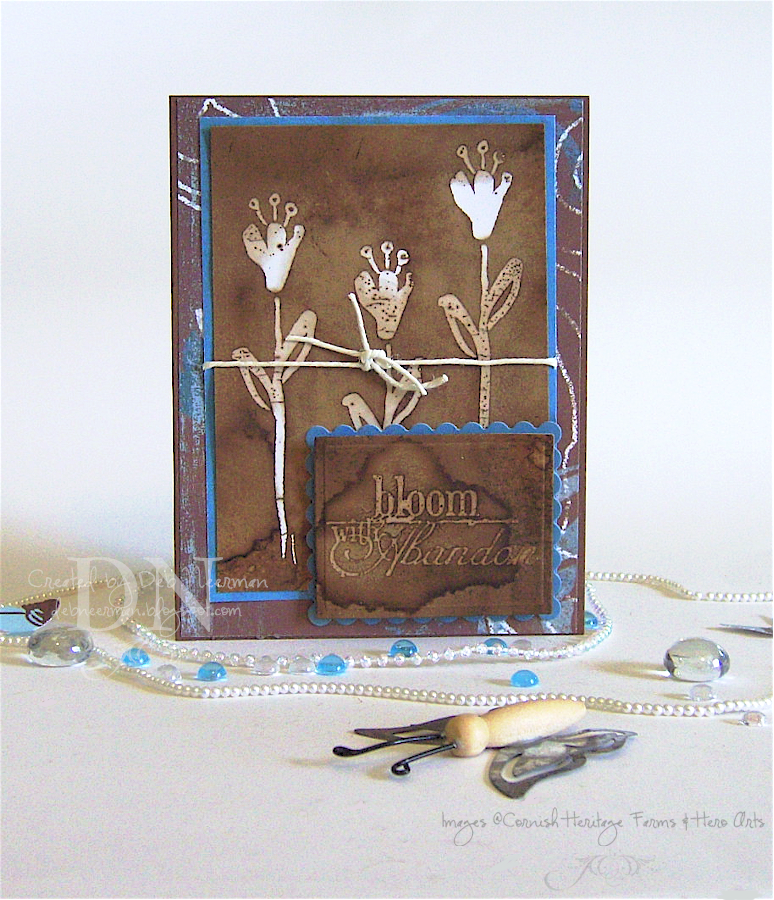
Bloom with Abandon ... Walnut Ink Resist Technique

Pin It


Happy Friday, boys and girls, and welcome to another edition of MACM! No, no, nothing like Kristina's Make a Card Monday. My version of MACM is "Making a Card ... Mess!"

With my art roots being in mixed media collage and assemblage, mess-making comes naturally to me! But with my "spray in a box" technique, this project really isn't all that messy ... and, if you're like me, you already have 20 gallons of walnut ink stashed somewhere in your studio. Today we're gonna put it to good use!

It's really very simple to achieve this look: you'll need white matte card stock, a bold stamp, watermark ink, clear embossing powder, a heat gun, walnut ink, an old shoe box, and a soft cloth or paper towels.

I stamped my "Long Stemmed Lily" stamp three times on Xerox 110# matte card stock using Versamark watermark ink. I covered my stamped images with clear embossing powder and embossed with my heat gun. I followed the same steps with my sentiment stamp.

Now for the messy fun part! Fill a spray bottle with walnut ink (follow package instructions, or ask me for mixing directions, if you're starting with walnut ink crystals). Place your stamped and embossed images in the empty shoe box and spray ... liberally ... with the walnut ink. Then spray again ... liberally. I like to cover the entire sheet of card stock with ink, encouraging lots of little puddles ... that's what makes the piece interesting! Using your hands, rotate the inked card stock, allowing the ink to puddle and pool. Once you're satisfied with the ink's coverage, you're done! Simply allow the card stock to dry naturally ... overnight is best.

When completely dry, simply wipe the embossed areas with a cloth or a paper towel. You might slightly dampen the cloth or paper towel for faster removal. Then use your uber-kewl, walnut-ink, clear-embossed-resist piece in your next project!

This technique is a great way to enhance a vintage-inspired project, but any stamp or style will work here ... with the possible exception of finely detailed stamps. Try it! I'd love to see what you create, so if you do use this technique please post a link in the comments.

Thanks so much for sharing part of your busy day with me; have a great weekend!

~Hugs,


Card Stock: Cut Card Stock, Xerox 110#; Designer Paper: My Mind's Eye "Bohemia" Collection; Stamps: "Long Stemmed Lily" by Hero Arts, "Bloom with Abandon" Cornish Heritage Farms; Ink: Versamark Watermark; Walnut Ink: 7gypsies; Waxed Linen: 7gypsies; Die-Cut Machine: Provo Craft; Dies: Nestabilities by Spellbinder's; Adhesive: ATG 714; Dimensionals: All Night Media

Saturday, May 3, 2008

We Have A New Winner ... For All the Wrong Reasons

Pin It

No good deed goes unpunished.

When the Diva Impressions stamp giveaway winner didn't come forward, I decided it would be nice of me to spend some time hunting her down. And, in the so doing, I discovered that the 'winner,' had already stolen received her prize!

Confused? Turns out the 'winner' has an online scrapbook store ... and in that scrapbook store she's selling some vintage ephemera. Which is fine with me ... what's not so fine with me is the fact that she stole photographs and listing descriptions from my eBay store.

On the photographs, she's neatly cut off my watermark and the name of my eBay store ... text, she's copied verbatim. This is beyond wrong, it's also illegal; blatant copyright violation such as this is enforceable in any court in this country. If this happened on eBay, this gal's store would be shut-down completely in a matter of minutes pursuant to eBay's VERO policies.

Never in a million years would I expect someone in this craft to do such a lousy thing to another crafter! And then to have the stupidity audicity to come to my blog, post comments, and enter to win goodies I'm giving away! Well, I like to think I'm a nice person but I'm afraid giving this gal free blog goodies is beyond my threshold for pain!

So, I went to random.org this a.m. and entered all comment numbers (not including deleted comments), for a new winner.

Here's the results:

Random Integer Generator
Here are your random numbers:16
Timestamp: 2008-05-03 15:14:20 UTC


The new winning number is #16, nappy2cu, who's comment reads, '"This "Bloom" stamp makes me feel happy and hopeful, which frankly has been a bit of a challenge lately. Diva Stamps are good medicine!'"

So, congratulations nappy! Please contact me with your mailing address and I'll get these gorgeous Diva Impressions rubber stamps to you ASAP!

~Hugs,

Thursday, May 1, 2008

15 Minute Project ... a "Thinking Outside the Box" Challenge Entry

Pin It


Today's card project was created for Sharon's "Stamp Simply" blog Challenge. This week, Sharon's challenge called for "Thinking Outside the Box" ... meaning to use a stamp in some way other than the way it was originally intended to be used. Got all that? Good!

It took me longer than 15 Minutes to decide on a stamp, but once I did it was downhill from there.

I chose to use this "Outlines" ladybug stamp. I stamped my image on Xerox 110# card stock and once again on DCWV colored card stock. Then I flipped it upside down, punched out some card stock flowers and leaves, and created a shadow with a Copic marker (W1)

I mounted everything on my base card stock using dimensionals and added a loop of ribbon for ... for some reason I can't remember ... it seemed like a good item at the time ... and was done!

Regarding the Diva Impressions stamp giveaway, I've yet to hear from the winner (either one, actually), sooooo I'll wait a couple of days and if the winner still hasn't surfaced, I'll draw again for a new winner. So, if you originally posted a comment on that giveaway, you may have another shot at winning 'em!

Thanks so much for sharing part of your busy day with me!

~Hugs,


Card Stock: Xerox 110#, Prism, DCWV, Bazzill; Stamp: Outlines Rubber Stamps; Ink: Ranger Distress Ink in Black Soot; Copic Marker W1; Die Cut Machine: Provo Craft; Dies: Spellbinder's; Punches: Various; Grosgrain Ribbon: Unknown, Obtained in a Ribbon Share

Monday, April 14, 2008

I Win, You Win, I Win Again ... and a RAK!

Pin It

Well, I'm having a good day*, LOL!!

But enough about me, let's get on with the winner of the Ribbon Ring storage system Giveaway!

Random.org chose Comment #3 ... which reads, "Can I have the sample kit please? Alright, I will stand in line to see if you randomizer will pick me."

Congratulations, Annapurna, it did! You've won the Ribbon Ring Storage System Starter Kit! Please email me your address and this kewl baby will be on it's way to you posthaste! Thank you all for entering!

*Good Day News #1: My "Wild Thing" card, located here, was chosen as one of two winners of Poetic Artistry's April "Mojo Madness Contest!" How kewl is THAT?!? The prize is a stamp set of my choice from Verve Visual ... I chose THIS one. Now tell me, how gorgeous is that!?!?

The other Mojo Madness winner is Nancy of iStamp ... you gotta see this card; it's simply amazing. Click HERE to see Nancy's winning entry. Then come back.

*Good Day News #2: The oh-so-talented-and-glittery-haired Jennifer bestowed upon me this "You Cheer Me Up" award ... featuring Lucy, Ethel, and friend:

Many thanks, Jennifer! And in case you're one of the five people in Blogdom who hasn't visited Jennifer's blog, "Glitter in My Hair," well, then you must! Then come back.

*Good Day News #3: The amazing Risa of "Life's Simple Pleasures" sent me this adorable RAK:

Sooooooo stinkin' cute ... and her coloring and glittering skillz rock!! Thanks, Risa, I love it!!

Wowzer, there's more links in this post than a necklace!! But check 'em all out; you'll be glad you did!

I'll be back tomorrow with another challenge project ... Thanks for sharing part of your busy day with me!

~Hugs,

Saturday, April 12, 2008

Free Blog Candy ... Ribbon Ring Starter Pack Giveway

Pin It

Hope everyone is enjoying their weekend!

If you're like me, you have tons of ribbons and a real problem storing them. Well, I've solved my ribbon storage problem, and hopefully yours as well!

This:

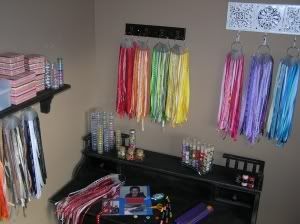
is a close-up view of the main components in the "Ribbon Ring" ribbon storage system. Here's a wide angle view of the system in use:

While searching for an inexpensive ribbon storage solution, I discovered the "Ribbon Ring" web site and was floored by this concept! I contacted the owner, Melissa Bickle, who generously offered to send me a sample kit to give away to one of my wonderful blog visitors.

To win this kewl ribbon storage system, simple leave a comment on this post and I'll have a random drawing for the winner. If you don't have a blogger.com account, please be sure to leave your email address in your comment so that I have a way of contacting you if you win.

Here's a look at a typical stamping/crafting work area with the Ribbon Ring system in use:

Kewl, huh?!? This system makes it easy to see at a glance what you have and how much you have left. Even better, no more tangled ribbons!

This space-saving system is ideal for me; the starter kit comes with one large metal hinge ring, thirty ribbon tags, and fifteen inventory dots ... all for only $10.00! You can also purchase additional ribbon tags in bundles of 30, 60, or 90. It doesn't get any better than this!

If you'd like to win this uber-kewl ribbon storage system, simply leave a comment on this post; random.org will decide the winning post on Monday, April 14. One request: please number your post.

If you can't wait, you can order your own system from
ribbonring.com ... shipping is lightening-fast; I had my new ribbon storage system in a matter of days!!

Thanks for spending part of your busy day with me!

~Hugs,

Friday, March 21, 2008

I've Been Tagged, Bagged, and Flagged ...

Pin It

I haven't been doing much creatively speaking ... unless you consider napping, sneezing, and coughing 'creative' ... but I did want to acknowledge a couple of my dear bloggin' buddies.

First, the amazingly talented, uber-creative, (and funny!)
Linsey, tagged me. We've done this once already and lots of you kindly pointed out how incredibly boring I am. So, I thought I'd try to make these seven facts about me a bit more interesting. How's this:

  1. For years I wrote and hosted a weekly humor web site, "Life with Deb" ... I still get emails from folks all over the world asking me to reprise it;
  2. I'm seriously thinkin' about doing it ^;
  3. I have absolutely no patience with mechanical objects ... and that can get ugly;
  4. I have two novels and four children's books lookin' for publishers;
  5. I can fly ... err, pilot an aircraft;
  6. I play cutthroat Scrabble ... and I'm r-e-a-l-l-y good at it; and,
  7. I'm terrified of alligators ... and if you've ever seen one attack, you know why.

I've previously tagged seven of my favorite bloggers, so you and I are gonna let this "tag-you're-it" thingie die of old age right now. Unless you want to be tagged; in which case, "tag, you're it!"

In other bloggin' news, the super-sweet and wonderful Nettie passed this kewl award on to me:

Awww, isn't that the sweetest thang?!? According to the terms of this award, I have to pass this on to five bloggers I find inspiring. So, in no particular order, I award:

  1. Lani;
  2. Linsey;
  3. Steph;
  4. Chel; and,
  5. Kathi.

If you've already received this award, then ... never mind.

I'll be back with a project or three soon. In the meantime, I hope you're enjoying your holiday weekend.

Thanks for spending part of your very busy day with me!

~Hugs,

Saturday, March 15, 2008

5 Minute Project ... How Many Colors Can You Name?

Pin It

Tonight my BFF sent me this simple test to take and I thought, "how easy is this gonna be?" Well, it turned out it's a lot harder than you'd think ... I think it has something to do with that giant timer.

So, while I assumed I could name hundreds, well ... I couldn't.

Now you go:

76
It's harder than it looks, isn't it?!?

I'll be back with some project or another tomorrow.

Thanks for spending part of your busy day with me!

~Hugs,

PS: Thanks, Rockin' Chickita! But you never did mention how many you were able to name ...

Thursday, March 13, 2008

Two 15 Minute Projects ... Using Fiskars Texture Plates in the Cuttlebug

Pin It


Today's 15 Minute Projects were created with backgrounds texturized using Fiskars Texture plates and the Cuttlebug. This ^ background was created with Fiskars Plate, "Dots."

The embossed dots on the "flower" were created in the "Swiss Dots" Cuttlebug embossing folder using Bazzill card stock.

In the foreground, you can see two additional backgrounds created with Fiskars Plate, "Feathers," and Fiskars Plate, "Raindrops." As always, you can click on the photos for a closer look at the backgrounds.

After a few fits and starts, I came up with this recipe to create these kewl texturized backgrounds:

  1. Spacer Plate A;
  2. Fiskars Texture Plate, face up;
  3. Card Stock, face down;
  4. Two 1/16" thick rubber gaskets (6" x 7 3/4" overall);
  5. One Spellbinder's Tan Embossing Plate; and,
  6. Cutting Plate B.

As I mentioned in my previous post, always use great care when attempting to move large stacks through the Cuttlebug. Please scroll down and refer to my previous post for where to purchase these gaskets, additional tips, and some precautions.


This ^ background was created with Fiskars Plate, "Whimsy," which is shown here in the foreground.

Please note that what works in my old 'Bug, may not work in yours. The rollers in the Cuttlebug are not set exactly the same in each and every machine. You should have no problem passing this stack through your machine, but if your 'Bug is new, you may not have success right off the bat. Try again later when your machine has broken in a bit.

These cards will go in my emergency stash; I'll add more embellishments or stamped sentiments when I'm ready to use them.

Overall, I'm pretty pleased with these backgrounds ... and especially happy to know that I'll get lots of use out of all the Fiskars plates I purchased. Even better, no boring, time-consuming rubbing with the texturing tool. The Cuttlebug makes texturing card stock a snap!!

Have fun creating these neat backgrounds with Fiskars Plates and the Cuttlebug. I'd love to see what you make with your Texture Plates and the Cuttlebug!

Thanks so much for sharing part of your busy day with me!

~Hugs,

Tuesday, March 11, 2008

15 Minute Project ... Using Brass Embossing Stencils in the Cuttlebug

Pin It

If you're like me, you're always trying new techniques, or tips, or tools, or all of the above.

After several false starts, and a couple of scary moments, I was able to finally get a great impression using my old brass embossing stencils and the Cuttlebug:

Not a bad impression, if I do say so myself! Be sure to click on the photo for a super-sized view.

Here's the stacking recipe:

  1. Spacer plate A;
  2. Cutting plate B;
  3. Brass stencil;
  4. Card Stock
  5. One Spellbinder's tan embossing mat;
  6. Two 1/16" thick rubber gaskets (6" x 7 3/4"); and,
  7. Cutting plate B.

Now, and this is the hard part: actually finding the 1/16" thick rubber gaskets! I found mine after several unsuccessful searches in a Home Depot. Then one day, I unexpectedly stumbled over them on an end cap.

Later, when I went back to buy more, they had gone missing. The helpful hardware man said that his computer showed them being 'somewhere' in their massive inventory, but they couldn't be found. I believe they originally came from the plumbing department. But persevere, they're in there somewhere! You might even search online for 1/16" thick rubber gasket, buying it cut to at least 6" x 6," or purchasing a larger sheet and sharing with your friends and blog pals. You might even try using other flexible 1/16" thick material such as Fun Foam, a dollar store mouse pad, rubber jar openers that political candidates stick in your front door, rubber shelf liners, or pink hair-roller or packaging foam.

The second hardest part is getting the stack through the 'Bug ... on my first attempt, the 'Bug wasn't having any of it ... and I just couldn't bring myself to force the stack through the machine. Fear'll do that to ya!

But, being the ridiculously stubborn fearless gal that I am, not to mention my distaste for 'losing' to inanimate objects, I tried again. I'll be honest: the 'Bug was squealing and hopping around, the sound of plates crunching and crackling hurt my heart, and my nerves were shot ... but I did it anyway. Surprisingly, and much to my relief, it worked like a charm! And in spite of all the noise, no damage to either the machine or my plates.

It's been my experience with my 'Bug that it will get 'used to' accommodating increasingly thicker stacks and, once you get a stack through it, each successive use goes through easier and faster. Meaning that if your 'Bug is newish, you might want to "break it in" for a couple of months or so before attempting the dangerous but impressive triple axle.

From my experience and those of others, it seems that no two 'Bug rollers are set exactly the same, so proceed cautiously. We don't want to kill your 'Bug here! Begin by leaving one of the 1/16" rubber gaskets out of the stack and see how easily it goes through and adjust accordingly. Also try experimenting with card stock, paint sample cards, or chipboard shims in place of one of the rubber gaskets.

While this stacking recipe worked for me, there's no guarantee, either implicit or implied, that it will work for your machine. And I hereby absolve myself of all responsibility if your 'Bug goes belly-up on this chancy maneuver. The last thing I want anyone to do is ruin their Cuttlebug ... so please, PLEASE proceed with care and caution, and DO NOT force anything through the 'Bug that really doesn't want to go. However, if your jonesin' for the new 'Bug that I hear is about to debut, have at it!

If this stacking recipe works for you, I'd love to see what you've embossed! Either post a link in my Comments to your online gallery or blog, or email me and I'll upload your image to my image host.

Ingredients: Textured Card Stock, (Bazzill); DP, (BasicGrey); Scraps of Digital Paper; Brass Stencil, (Plaid); Dimensionals, (Fiskars); Ribbon, (Offray); Velvet Flowers, (Maya Road); Eyelets, (Unknown, Found in Mt. Eyelet)

Tomorrow, I'll show you the beautiful results I got using my Fiskars Texture Plates in the 'Bug.

Thanks for sharing part of your busy day with me!

~Hugs,

Sunday, March 9, 2008

The Joy of Bloggin' ... or, I've Been Tagged

Pin It

I've been tagged by Catherine at Inksomnia ... if you really don't care to read seven little-known facts about me, (and seriously, who could blame you?), why not hustle on over to her blog and check out Catherine's amazing projects!

  1. I pitched for a Connecticut State Champion softball team for years;
  2. I am a dessert junkie! I'll skip right past filet mignon to get to the pastry cart;
  3. I am fanatical about college basketball. Go UCONN!;
  4. I am a Notary Public;
  5. I am licensed to drive a motorcycle;
  6. I'm an avid sport-fisherman; and,
  7. I went to Catholic schools w-a-y longer than necessary!

Pretty tame stuff, huh? Anyway, according to official Blogdom tag-rules, I'm supposed to share the chore love with seven other bloggers, so I tag:

  1. Lani;
  2. Kathi;
  3. Risa;
  4. Ana;
  5. Anna;
  6. Flossie; and,
  7. Allison.
Sorry ladies, but inquiring minds wanna know. However, I believe that if I don't specifically tell you that you've been tagged, you're not. And if anyone else wants to play, then consider yourself tagged!

So, today, I've been experimenting with the Cuttlebug, Fiskars texture plates, and some miscellaneous brass stencils and I've got some really neat stuph to show you!! That will have to be tomorrow though, so check back then. Better dust off all those old embossing stencils you've had for-evuh!

Thanks so much for sharing part of your busy weekend with me!

~Hugs, Deb

Saturday, March 1, 2008

15 Minute Project ... Pretties Created Digitally!

Pin It


All of the cards you see here were created in 15 minutes using digital scrapbook paper, ribbon, and embellishments! As always, click on the image for a better view.

Digital and hybrid card making is really coming into it's own recently and with good reason! Besides giving you the ability to create beautiful projects, you'll never 'run out' of your materials: downloaded files stay on your hard drive where you can access them time and time again.

Also, the flexibility of digital images allows you to mix things up ... even using the same kit, you need never create the same card twice. Even better, you can find digital 'freebies' all over the Internet, or at extremely reasonable prices.

All of the papers and embellishments I used for these three cards are available absolutely free of charge HERE. If you've been curious about creating digitally, here's the perfect opportunity to try! Not only will you obtain a free kit created by one of the hottest designers in the industry, you'll be able to use Nichole's own instructions to get started. It doesn't get any better than that!

After downloading the kit, visit Nichole Heady's blog, HERE, for the complete tutorial.

After I printed out my papers and embellishments and cut them out, assembly was fast and simple. I've done very little to enhance these three projects save for the addition of some Sharpie gold paint, some die-cut mats, and a scrap of ribbon. Otherwise, it's digital all the way, baby!

I'd love to see what you create using this kit! Please link to this post and add a comment letting me know where to go see your creation. If you don't have a blog, you can email me your photo, and I'll upload them here for you.

So go on, take the plunge into digital card making! Once you do, you'll find a fun, new world of crafting potential!

Thanks so much for visiting today; enjoy your weekend!

~Hugs, Deb

Ingredients: Textured Card Stock, (Bazzill); Digital Scrapbook Kit (PaperCrafts Magazine, Designer: Nichole Heady); Gold Paint Pen (Sharpie); Dimensionals, (Fiskars); Ribbon, (Offray) Ticket Corner Punch, (Stampin' Up!); Corner Rounder Punch, (Carl's); Die Cut Machine (Provo Craft); Nestabilities Dies (Spellbinder's)

Friday, February 29, 2008

15 Minute Project: Recycle Your Magazines into Pretties ... Redux!

Pin It


I'm having one of those days; you know the kind ... where everything that can go wrong will go wrong? Yup, like that there! And it appears to be contagious as the DH just failed an important test, was involved in an automobile accident, and, due to the accident, stood-up his new, uber-important client. And of course his cell phone was left home by accident, too.

Anyway, I photographed this card at least 150 times today; 149 of them with the card standing upright, and 1, this one, laying down. Which, if I'm being honest, was the result of a little hissy fit. I flicked it with my fingers, you know to punish it for not cooperating, and actually liked the way it fell. So I took a photo thinking "aww, what the heck, it couldn't be any worse than all the others." And then, it turned out to be the best one ... go figger.

So, there's your explanation for this photograph and it's strange orientation. 'Course, I could've said this was the "new, improved, and uber-kewl" way to photograph cards, but that would be dishonest. Unless, of course, everyone else in Blogdom starts doin' it. In that case, I invented the concept and you saw it here first, okeedokee?!?

Today's card was created with a beautiful sentiment stamp from "Healing Expressions Art Stamps" and another recycled magazine image. Again, I cut it out from a nature magazine that was on it's way into the recycle bin; I rescued this photo of sweet peas 'cuz I like sweet peas ... and what flower is more fragrant that sweet peas?!? Alright, hyacinths ...

I cut the image using my Large Classic Rectangle Nesties. TIP: Use your die as a "view-finder" by placing it over your image, moving it around to until you find the most pleasing composition. Then lightly tape your die in place and cut out your image in your die-cutting machine.

I matted my image using dimensionals on three layers of card stock and covered the card base with a scrap of designer paper. I stamped my sentiment, available HERE with Royal Purple Staz-on ink, added a lavender binder clip with a bit of ribbon, and two matching metal file clips.

Finished in less than 15 Minutes and saved a tree ... maybe it's not such a bad day after all. And for any of the family members who might be reading this, he's fine.

Thanks for sharing part of your busy day with me; have a great weekend!

~Hugs, Deb

Ingredients: Textured Card Stock, (Bazzill Basics and DCWV); Designer Paper, "K-ology, Verbena" (K&Company); Stamp: (Healing Expressions Art Stamps); Ink, Staz-On (Tsukineko); Dimensionals, (Fiskars); Metal Embellishments, (Unknown; found in Mt. Metal Stuph); Ribbon (Darice); Die-Cut Machine (Provo Craft); Nestabilities Dies (Spellbinder's)

Wednesday, February 27, 2008

15 Minute Project: Recycle Your Magazines ... Into Pretties!

Pin It


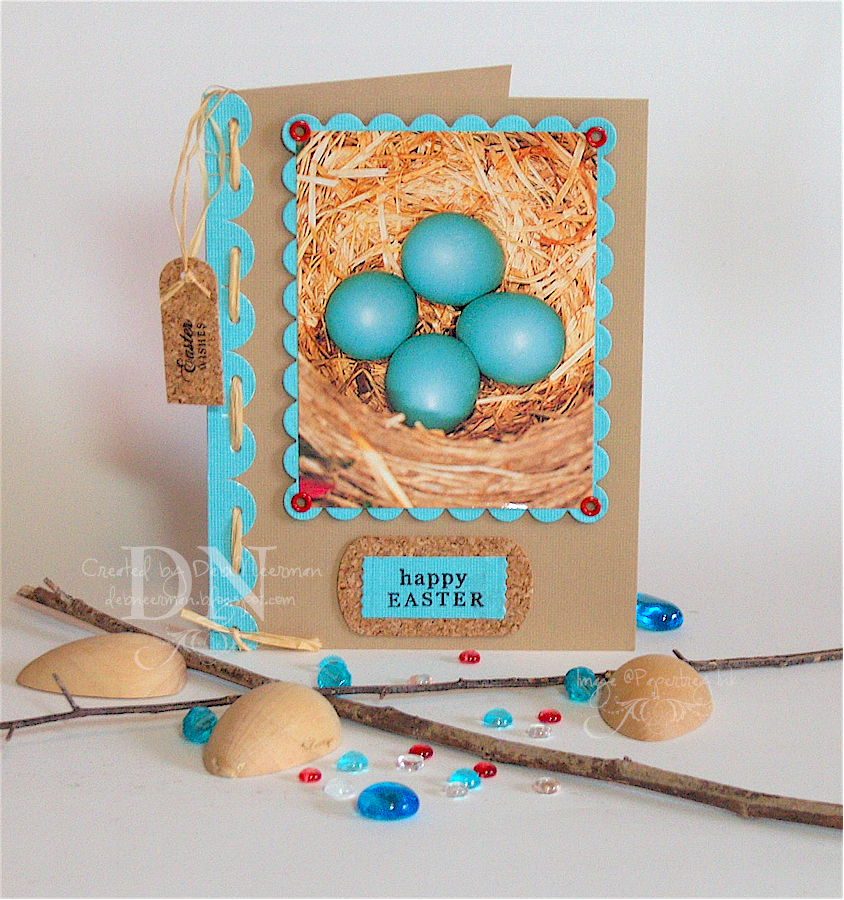
Today's card was created with an image I found in an old nature magazine. Always go through your old magazines before you toss 'em ... not only will you find some terrific photographs to use in your art work, you'll be livin' green ... and saving a tree or two!

I matted my recycled focal image onto a scalloped edge mat, and adhered some bright red eyelets. I created the large scallop border using my slit punch and wove some raffia through the holes I punched.

I used self-adhesive cork to create the tag and the mat for my sentiment. The tag was cut with a die from the Cuttlebug "Tiny Tags" set and the mat was punched with a key chain tag punch.

I stamped my sentiments using Staz-On ink, adhered 'em, and I was done!

Tip: To speed up your card making process, cut several mats or tags when die-cutting ... you'll have a stockpile to go to when you're in a rush.

Thanks so much for spending part of your busy day with me! And I hope you'll find a couple of minutes to create a card for Lois (see post below).

~Hugs, Deb

Ingredients: Textured Card Stock, (Bazzill Basics, DCWV); Self-Adhesive Cork, (Karen Foster); Stamps, "Unlimited Labels" and "Mixed Messages" collections (Papertrey Ink); Ink, Staz-On (Tsukineko); Raffia, (Unknown; I've had this for-evuh); Eyelets, (Unknown; found in Mt. Eyelet); Die Cut Machine and Tag Die (Provo Craft); Nestabilities (Spellbinder's); Key Chain Tag Punch, (Stampin' Up!); Slit Punch (Stampin' Up!)

Friday, February 22, 2008

I Can NOT Get this Song Outta My Head ....

Pin It

So, I'm puttin' it in yours. But no worries, you'll like it in there.

I'll have a project or three for you tomorrow.

Thanks for sharing part of your busy day with me!

~Hugs, Deb
Monday, February 18, 2008

Sale Mania!!

Pin It

Hi everyone! Just a quick post to let you know that no, I haven't died, been sold into slavery, or kidnapped by terrorists ... nope, not even institutionalized ... I'm just supah-busy!

Since eBay has ruined changed selling for store owners, I've been forced to make some decisions.

Just so you know, here's eBay's latest ridiculous genius decision: you can no longer sell anything on eBay for less than 1.00. So, in one fell swoop, the idiots suits in charge have just about ruined every craft and scrapbook store on eBay ... including mine. Since I've been selling DP's for .50 a sheet, I either had to pull all the auctions and relist, losing lots of $$ in the process ... not to mention hours and hours of time, or close my store.

But wait, the good news is that they've increased fees too! Awesome, huh?!? Thanks eBay!! See, you really CAN get "it" on eBay: including the shaft!!

And we're not even gonna BEGIN to discuss what they've done with "Feedback" ... a hint: it's beyond comprehension!!!

Soooo, I decided to try something else before pullin' the plug on my eBay store: I put all of the scrapbook paper in my store on sale. And, holy pajama's, I've been busy! People are grabbin' tons of these discontinued .40 sheets of designer paper!! It's been nutzzzzzzz!

So, if you're in the market for a great buy on Designer Paper, hurry by ... and go quick, seriously ... these babies are literally flyin' off the shelves!

Click HERE to visit my eBay store ... while I've still got one.

I'll post a card project or info on building your own "Infinity Background" tomorrow ... I hope.

Thanks for sharing part of your busy day with me!

~Hugs, Deb