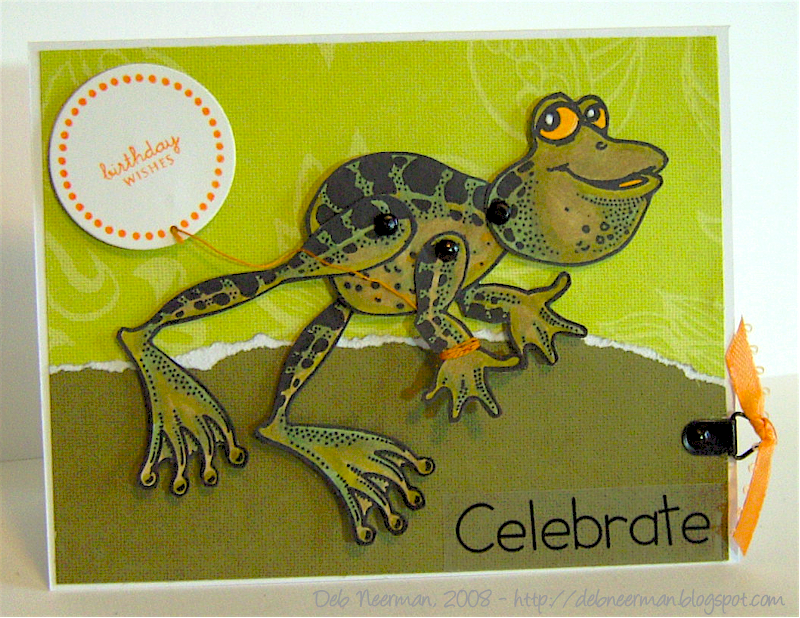
As I was making this card (click on image for a closer look) for my 5-year-old nephew’s birthday, I realized that I’d torn my paper. Seriously, nothing get’s by me!
Anyway, the tearing on this card now qualifies it for Sharon's "Tear it Up" blog challenge.
What with all the cutting and coloring though, it sure doesn't qualify for a "15 Minute Project!"
This 5 1/2" x 4 1/4" top-folded card was created using my new favorite card stock: Xerox 110# in white. The frog image(s) were also stamped on this awesome card stock.
The stamp set I used here, “Frog” … (clever, no?), which is probably 128 years old, is actually comprised of three separate stamps: the head, the torso, one leg and one arm. I stamped the legs and arms twice (good with math, too), with black Palette Hybrid ink, and then colored all of the froggy body parts with Copic markers.
I added designer paper to my card stock base, tearing the top edge of the solid color. I mounted a black frame hanger using a brad on the bottom right side of the DP and adhered the mat to my card stock with my tape runner.
This is one of my first attempts (okay, I lied ... it IS my first attempt), to color an entire image with Copic’s and I’ll be the first to admit it’s not as good as it could be. There is a huge learning curve with these alcohol-based markers and those in the know say that the key to success is practice ... and blending. I’ve got a long way to go but I’d say that this rates as a ‘fair’ beginning. FYI: I added a spot of white ink to the eyes using a Signo gel pen.
Once I wasresigned to happy with my coloring, I cut out all six images and pieced the frog together using brads. I left the front froggy arms and legs unattached to the card so that they are moveable; I mounted the torso, the head, and the back arms and legs to my card using dimensionals, so those parts aren’t moving anywhere!
Next, I stamped my ‘balloon’ using Palette Hybrid ink on Xerox card stock using a dotted circle border stamp; I used the same ink to stamp the sentiment inside the balloon. I cut out the balloon using my Nestabilities die: the next-to-the-smallest circle from the Large Classic Circle set.
Using a hand-held 1/16” punch, I punched a hole in one of the dots and tied embroidery floss through the hole, then across the body of the frog, and secured it by tying the thread around the froggy’s wrist.
Finally, I added a sentiment sticker/rub-on to the card and tied a bit of orange ribbon on the frame hanger.
Ingredients:
~White Card Stock: Xerox 110#
~Designer Paper: Unknown, packaging removed for storage purposes, (I want to say Amy Butler. So I will, “Amy Butler.”)
~Stamps: ‘Frog’ (Cow Town);
Sentiment, “Mixed Messages” collection (Nichole Heady for Papertrey Ink
~Ink: Palette Hybrid, “Noir” and “Orangerie” (Stewart Superior); White Gel Pen (Signo)
What with all the cutting and coloring though, it sure doesn't qualify for a "15 Minute Project!"
This 5 1/2" x 4 1/4" top-folded card was created using my new favorite card stock: Xerox 110# in white. The frog image(s) were also stamped on this awesome card stock.
The stamp set I used here, “Frog” … (clever, no?), which is probably 128 years old, is actually comprised of three separate stamps: the head, the torso, one leg and one arm. I stamped the legs and arms twice (good with math, too), with black Palette Hybrid ink, and then colored all of the froggy body parts with Copic markers.
I added designer paper to my card stock base, tearing the top edge of the solid color. I mounted a black frame hanger using a brad on the bottom right side of the DP and adhered the mat to my card stock with my tape runner.
This is one of my first attempts (okay, I lied ... it IS my first attempt), to color an entire image with Copic’s and I’ll be the first to admit it’s not as good as it could be. There is a huge learning curve with these alcohol-based markers and those in the know say that the key to success is practice ... and blending. I’ve got a long way to go but I’d say that this rates as a ‘fair’ beginning. FYI: I added a spot of white ink to the eyes using a Signo gel pen.
Once I was
Next, I stamped my ‘balloon’ using Palette Hybrid ink on Xerox card stock using a dotted circle border stamp; I used the same ink to stamp the sentiment inside the balloon. I cut out the balloon using my Nestabilities die: the next-to-the-smallest circle from the Large Classic Circle set.
Using a hand-held 1/16” punch, I punched a hole in one of the dots and tied embroidery floss through the hole, then across the body of the frog, and secured it by tying the thread around the froggy’s wrist.
Finally, I added a sentiment sticker/rub-on to the card and tied a bit of orange ribbon on the frame hanger.
Ingredients:
~White Card Stock: Xerox 110#
~Designer Paper: Unknown, packaging removed for storage purposes, (I want to say Amy Butler. So I will, “Amy Butler.”)
~Stamps: ‘Frog’ (Cow Town);
Sentiment, “Mixed Messages” collection (Nichole Heady for Papertrey Ink
~Ink: Palette Hybrid, “Noir” and “Orangerie” (Stewart Superior); White Gel Pen (Signo)
~Ribbon: Offray
~Adhesive: Tape Runner (Tombow Mono); Dimensionals (All Night Media)
~Accessories: Black brads (from Mt. Brad); Embroidery Floss (DMC); Frame Hanger (on the bottom of Mt. Brad); Sticker/Rub-on (Unknown, freebie from a paper-crafting company offer; thank you United States Postal Service and unknown paper-crafting company)
~Tools: Cuttlebug Die-Cutting Machine (Provo Craft); Nestabilities Die (Spellbinder’s)
So, hugs & kisses & birthday wishes, Ryan, … and I hope you’re not reading this!
PS: I’m nearing 1,000 hits ~ yay for me! To thank you, I’ll be putting together a nice packie of blog candy, the winner to be chosen by random drawing from #’d comment posts; yay for you!
Details and pix to follow the day we hit 1K visitors, okeedokee?!?


5 comments:
Just found yout blog! Lovely things youre makeing :-)
Thats just the cutest froggie card! I just found your blog and have to tell you I love the inspiration basket idea. I often forget what is not out in plain site in my scraproom. I think I need to make up a basket for my desk.
Hey Deb...the froggy is darling, but I wanted to tell you that you inspired a post on my blog tonight, if you want to check it out!
hugs,
Kathi
I'm new to your blog, but am really enjoying the ideas. Thanks!
Thank you Horsebroad! Come again any time!!
Post a Comment