Showing posts with label Healing Expressions Art Stamps. Show all posts

Thursday, August 14, 2008

Sailing, Sailing, O'er the Bounding Waves ... A Sneak Peek

Pin It


Before we get started, I have a quick question: does the remote control go inside the dinner knife or outside the soup spoon? I'm having dinner guests this weekend and I don't want any tragic faux pas, n'cest pas?

Okay, for all you sneaky-peekers, and everyone else I s'pose, this card project reveals our next Y.ou K.now Y.ou R.ock blog challenge theme. Does my card give it away? If you think you know, or just wanna guess, leave a comment on this post. The first commenter with the correct answer will receive absolutely nothing! Big fun, huh!?!

Anyway, August's rockin' challenge theme will be posted tomorrow on the Y.ou K.now Y.ou R.ock blog, or right here ... 'cuz I'm sure it'll come up in conversation I'm having with one of my multiple personalities! I kid ...

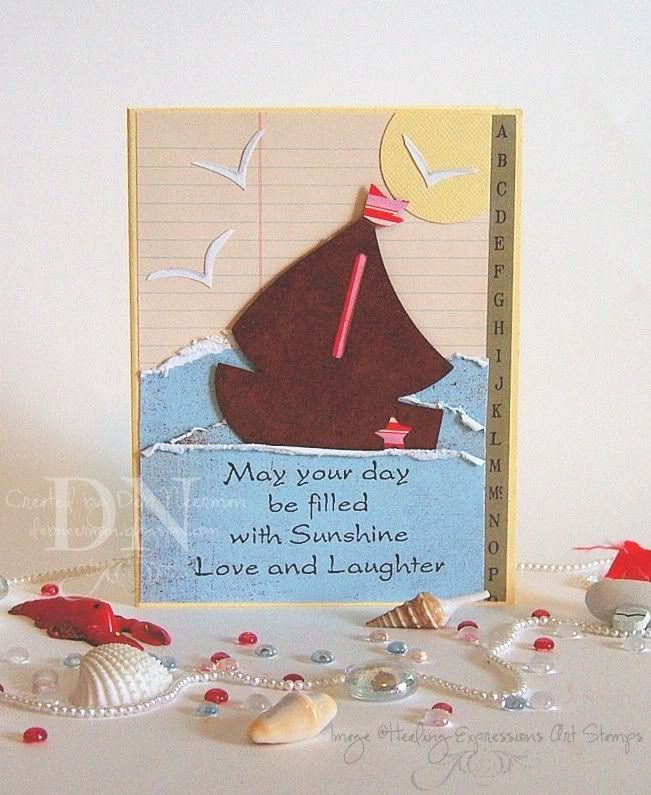
ONward. Today's card was created on Bazzill card stock then matted with designer paper from Making Memories. To create my 'waves,' I tore strips of BasicGrey heavy-weight paper, distressing the edges and curling them forward. I stamped my sentiment, from "Healing Expressions Art Stamps", available HERE, using black distress ink.

I cut out my 'sun' with a circle punch, hand-drew and cut-out some pathetic lookin' sea gulls, stuck my rusted tin sailboat between the 'waves' ... and anchor's away!

Finally, I tell you this 'cuz you deserve to know: Sweet and creamy when the weather's steamy ... it's National Cremesicle Day! Go ahead, indulge yourself ... it's practically the law!

~Hugs,


Card Stock: Bazzill Basics
Paper: "Ledger Combo," Making Memories; "Polar," BasicGrey; Red Stripe: Unknown
Stamp: Healing Expressions Art Stamps
Ink: "Black Soot" Distress Ink by Ranger Industries; Circle Punch by Punch Bunch
Accessories: Rusted Tin Sailboat by Rusty Tin-Tiques
Tools: Scrap Fusion PA by Ivy Scraps, Copic Marker

Thursday, April 17, 2008

'Patchwork of Memories' ... a "Suggestive Sunday" Blog Challenge Entry

Pin It


Today's card project was created for Allison's "Suggestive Sunday" blog challenge. This week's challenge: create something kewl using left-over scraps, itty bits, and tiny pieces of paper.

These ^ scraps are everywhere in my studio ... all left over from my repeated use of this uber-kewl "County Fair" paper collection. LOLOL, I warned you!

I simply wove the paper strips together, taped them in place, trimmed and distressed the edges, and mounted the piece on my card stock using ATG adhesive and brads.

I stamped this awesome sentiment stamp from Healing Expressions Art Stamps on Xerox 110# card stock using Palette Hybrid ink. I stamped the little PTI curlicue thingie in teal Palette Hybrid ink, then cut out the sentiment using Nesties from the Large Classic Oval collection. I used a Large Scallop Oval to cut the mat for the sentiment.

Finally, I added two picture frame hangers and some teal grosgrain ribbon. Easy-peasy and a fun way to use up all those scraps I know you're hoarding ... Ummm, oh yes you are!

I just realized that I've surpassed 10,000 hits, wowza! Thank you so much! In honor of the momentous occasion, I'm going to put together some nice blog candy booty for you. So watch for that as I really want YOU to win!

Thanks for spending part of your busy day with me!

Hugs,

Card Stock: Bazzill, Xerox 110#; Designer Paper: County Fair, October Afternoon; Stamps: Sentiment, Healing Expressions Art Stamps, Curlicue, Papertrey Ink; Ink: Palette Hybrid; Metal Embellies: Unknown, Found in Mt. Brad; Ribbon: Unknown, Obtained in a Ribbon Share; Cuttlebug Die Cut Machine; Nestabilities by Spellbinder's; Heidi Swapp Distressing Tool; Adhesive: Scotch ATG; Dimensionals: Fiskars

Wednesday, March 26, 2008

15 Minute Project ... Using an Embossed Background Created with Watermark Ink and the Cuttlebug

Pin It


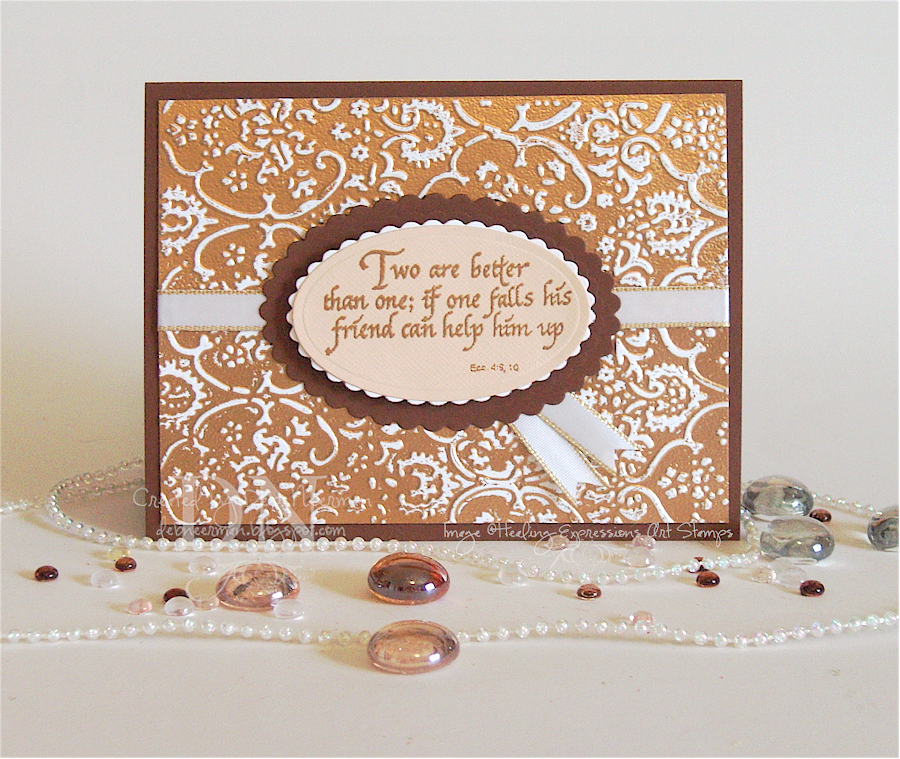
Today's "15 Minute Project" was created using an inspirational stamp from Healing Expressions Art Stamps. This unique Biblical sentiment stamp is perfect for sending support and friendship to someone special. I think it would make a really neat anniversary card too, but that's just me ...

I stamped the text using watermark ink and embossed with copper embossing powder. I mounted my stamped and embossed image on two oval scallop mats using dimensionals.

The kewl background was created using Versamark inside a Cuttlebug embossing folder; I embossed using copper powder. For this project, I used the "Textile" folder but any of them would work ... including the 2 x 2 embossing folders.

Using watermark ink, I coated the inside of the top flap (it's the flat side where the word "Cuttlebug" is printed in black ... it's the same side you'd use for normal folder embossing in the 'Bug), with a liberal coating of Versamark.

Insert your card stock, or other background paper, face up in the folder and run through your machine. Remove and coat the card stock with a generous coating of embossing powder. Then, heat emboss as you normally would.

You should clean your embossing folder as soon as possible to avoid staining ... watermark ink won't stain but other inks may. I used baby wipes to clean mine but soapy water works too.

My bloggin' friend, Julie, created a lovely distressed background with the same technique ... however, she used bronze Pearl-Ex for her color medium. Click HERE to take a look at Julie's amazing piece of art! Talk about WoW, huh?!?

Imagine all the creative possibilities using this kewl technique ... you'll have a hard time deciding where to begin!

I believe this technique began it's life on SCS, and I'd be delighted to credit the inventor. If anyone knows exactly who dreamed up this fun technique, please let me know.

Happy creating!

Hugs,


EDITED TO ADD: Jennifer (jennifer-g on SCS) was kind enough to write and tell me that Kurtis, the Stampin' Kub, was the creator of this kewl technique. Click HERE for the complete tutorial. Thanks, Jennifer; you rock!

And Kurtis, if you've somehow got lost in Blogdom and are reading this, thank you for creating and sharing such a fun and easy technique to use with the 'Bug!!

Friday, February 29, 2008

15 Minute Project: Recycle Your Magazines into Pretties ... Redux!

Pin It


I'm having one of those days; you know the kind ... where everything that can go wrong will go wrong? Yup, like that there! And it appears to be contagious as the DH just failed an important test, was involved in an automobile accident, and, due to the accident, stood-up his new, uber-important client. And of course his cell phone was left home by accident, too.

Anyway, I photographed this card at least 150 times today; 149 of them with the card standing upright, and 1, this one, laying down. Which, if I'm being honest, was the result of a little hissy fit. I flicked it with my fingers, you know to punish it for not cooperating, and actually liked the way it fell. So I took a photo thinking "aww, what the heck, it couldn't be any worse than all the others." And then, it turned out to be the best one ... go figger.

So, there's your explanation for this photograph and it's strange orientation. 'Course, I could've said this was the "new, improved, and uber-kewl" way to photograph cards, but that would be dishonest. Unless, of course, everyone else in Blogdom starts doin' it. In that case, I invented the concept and you saw it here first, okeedokee?!?

Today's card was created with a beautiful sentiment stamp from "Healing Expressions Art Stamps" and another recycled magazine image. Again, I cut it out from a nature magazine that was on it's way into the recycle bin; I rescued this photo of sweet peas 'cuz I like sweet peas ... and what flower is more fragrant that sweet peas?!? Alright, hyacinths ...

I cut the image using my Large Classic Rectangle Nesties. TIP: Use your die as a "view-finder" by placing it over your image, moving it around to until you find the most pleasing composition. Then lightly tape your die in place and cut out your image in your die-cutting machine.

I matted my image using dimensionals on three layers of card stock and covered the card base with a scrap of designer paper. I stamped my sentiment, available HERE with Royal Purple Staz-on ink, added a lavender binder clip with a bit of ribbon, and two matching metal file clips.

Finished in less than 15 Minutes and saved a tree ... maybe it's not such a bad day after all. And for any of the family members who might be reading this, he's fine.

Thanks for sharing part of your busy day with me; have a great weekend!

~Hugs, Deb

Ingredients: Textured Card Stock, (Bazzill Basics and DCWV); Designer Paper, "K-ology, Verbena" (K&Company); Stamp: (Healing Expressions Art Stamps); Ink, Staz-On (Tsukineko); Dimensionals, (Fiskars); Metal Embellishments, (Unknown; found in Mt. Metal Stuph); Ribbon (Darice); Die-Cut Machine (Provo Craft); Nestabilities Dies (Spellbinder's)

Wednesday, February 20, 2008

15 Minute Project ... Pretties in Less Than 1/4 of an Hour

Pin It


Today's '15 Minute Project' features another great sentiment stamp from
Healing Expressions Art Stamps©. You can purchase this wonderful unmounted stamp HERE.

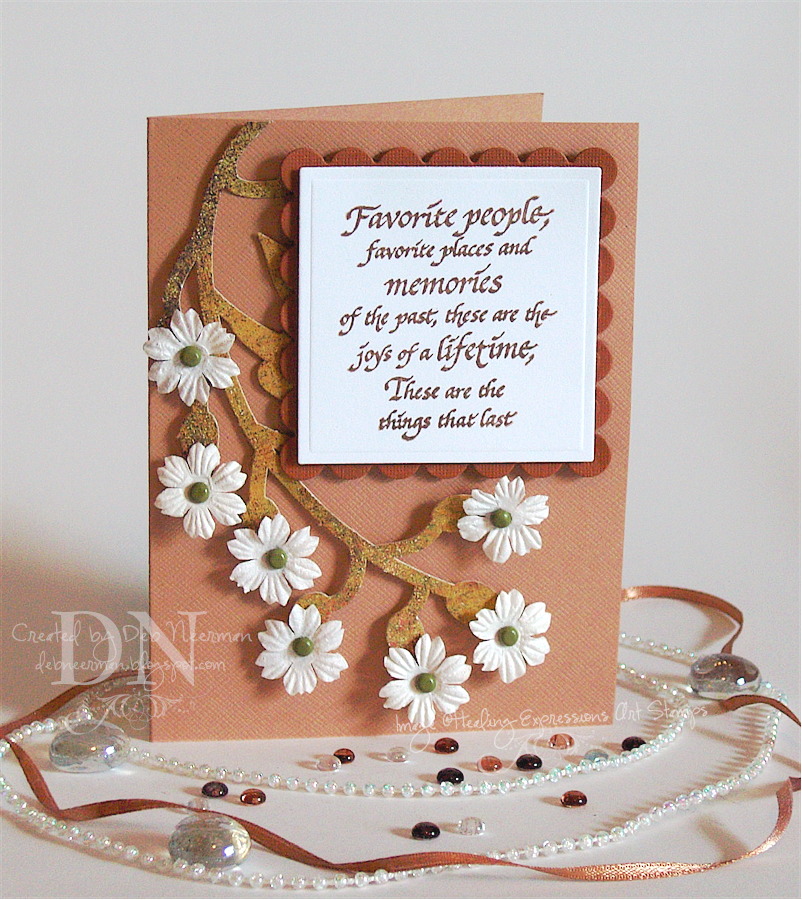
This 4 1/4" x 5 1/2" side-folded card was created super-fast using a die-cut 'branch,' some Prima flowers, some brads, and, of course, my stamp! Using Palette Hybrid ink (my favorite!), I stamped my sentiment on Xerox 110# card stock. I cut both the focal image and the scallop mat using the Large Classic and Large Scallop Nesties.

I mounted the branch to the card using dimensionals ... just look at those shadows!!!! I'm one happy stamper when I get shadows like that!

I attached the Prima's to the ends and mounted some of them using more dimensionals; I only used enough to actually keep the branch on the card ... the rest I left unattached.

Super-fast, super-easy, super-stamp, super-shadows, and almost, kinda sorta, super-elegant!

Ingredients:

  • Textured Card Stock: Bazzill Basics
  • White Card Stock: Xerox 110#
  • Die Cut: 'Infuse' Collection (BasicGrey)
  • Stamp: 'Favorite People' (Healing Expressions Art Stamps)
  • Ink: Palette Hybrid 'Burnt Umber' (Stewart Superior)
  • Accessories: Paper Flowers (Prima); Brads (American Crafts); Dimensionals (Fiskars)
  • Tools: Die-Cut Machine (Provo Craft); 'Nestabilities' Dies (Spellbinder's)

Thanks so much for sharing part of your busy day with me!

HAPPY BIRTHDAY, Frank!!! I love you!

~Hugs, Deb

Thursday, February 14, 2008

15 Minute Project, (If You Can Sew Fast) ... Pretties in Less Than 1/4 of an Hour

Pin It


Happy Valentine's Day! Today, be sure to tell everyone that you love just how much you love them ... then do it again tomorrow ... and the day after that ... and the day after that ...

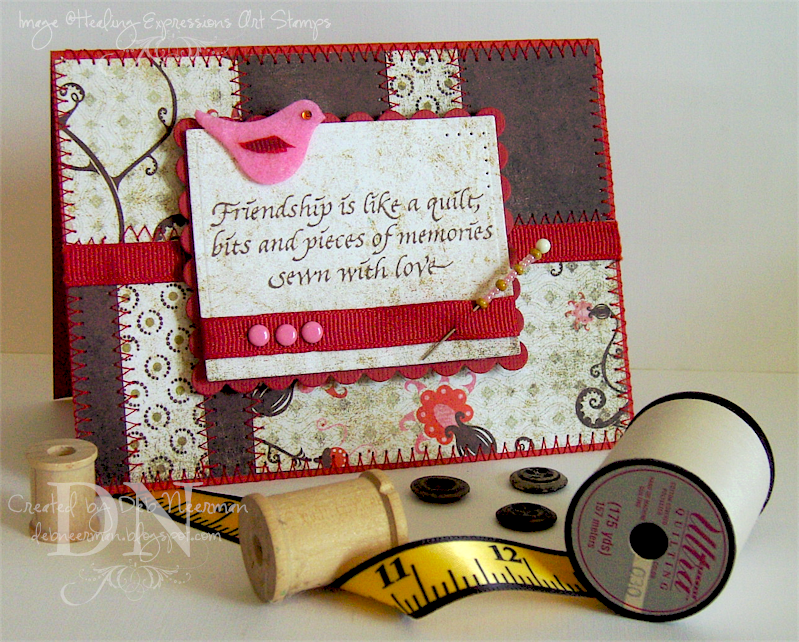
Speaking of love, I really {heart} this very kewl sentiment stamp from Healing Expressions Art Stamps©. Most people don't know this, but one of my very first creative adventures was quilting ... so now my secret is out: I have a long-standing love affair goin' on with fabric! And you can totally tell how awesome of a quilter I was by the excellent*** stitchin' on this card! (Not really ... )

I laid out my designer papers in a 'quilt-ish' design, keeping the 'quilt' to approximately 4" x 5". After I taped it all together (0n the back!), I sewed all the interior edges using my trusty old Kenmore and some complimentary thread. Once I secured the 'quilt' to the card base using double-sided adhesive, I stitched the 'quilt' on to my card stock and adhered some grosgrain ribbon across the middle of the card.

I stamped my sentiment, available here, on matching DP using Palette Hybrid ink, then I cut and embossed the image mat and the scallop-edged mat using the Nestabilities. In the 'white' space below, I adhered a ribbon embellished with brads and a home-made 'stick-pin.' In real life, my 'stick pin' is an embellished quilting pin ... I clipped the sharp point off with my snippers, though. Don't want any bloodshed on the greeting card!

In the 'white' space above, I adhered a felt bird with a tiny ribbon 'wing' and a faux rhinestone eye. The felt bird was mounted to my DP using dimensionals ... I do it for the shadows, ya'll, the shadows! I did just a teeny-tiny bit of paper piercing in the upper right-hand corner.

Ingredients:

  • Textured Card Stock: Pomegranate (Bazzill Basics)
  • Designer Paper: 'Infuse' Collection (BasicGrey)
  • Stamp: 'Friendship Quilt' (Healing Expressions Art Stamps©)
  • Ink: Palette Hybrid 'Burnt Umber' (Stewart Superior)
  • Adhesive: Tape Runner (Tombow Mono); Dimensionals (Fiskars)
  • Ribbon: 'Go with the Grain' (Michaels)
  • Accessories: Quilting Pin (Unknown; had it 4-evah); Seed Beads (Ditto); Faux Rhinestones 'Bella Gems' (My Mind's Eye); Brads (Unknown; found in Mt. Brad); Felt Bird (Maya Road)
  • Tools: Die-Cut Machine (Provo Craft); Nestabilities (Spellbinder's); Scor-It Board (Hammond); Sewing Machine (Vintage Kenmore)

***actually, not so excellent; and I really prefer sewing on card stock and heavy-weight paper.

Thanks for sharing part of your busy day with me ... have a sweet Valentine's Day with your honey!

~Hugs, Deb

Monday, February 11, 2008

Introducing 'Healing Expressions' Art Stamps©

Pin It


I did the patented Deb-Dance-O'-Joy this weekend when I received stamps from Lani Kent of Healing Expressions Art Stamps©. I'm thrilled to introduce you to Lani and her beautiful unmounted stamps!

I love the sentiments Lani has created for her line: all of them are timeless, meaningful, and very heartfelt. I can't wait to show you some of the other stamps in this collection! And, all of Lani's stamps are made from deeply etched red rubber; they take ink and stamp so beautifully! You'll find them perfect for all of your altered art, scrapbook, and card making projects. The sentiment stamp used in this project is available
here. Check it out, you're gonna love the price!

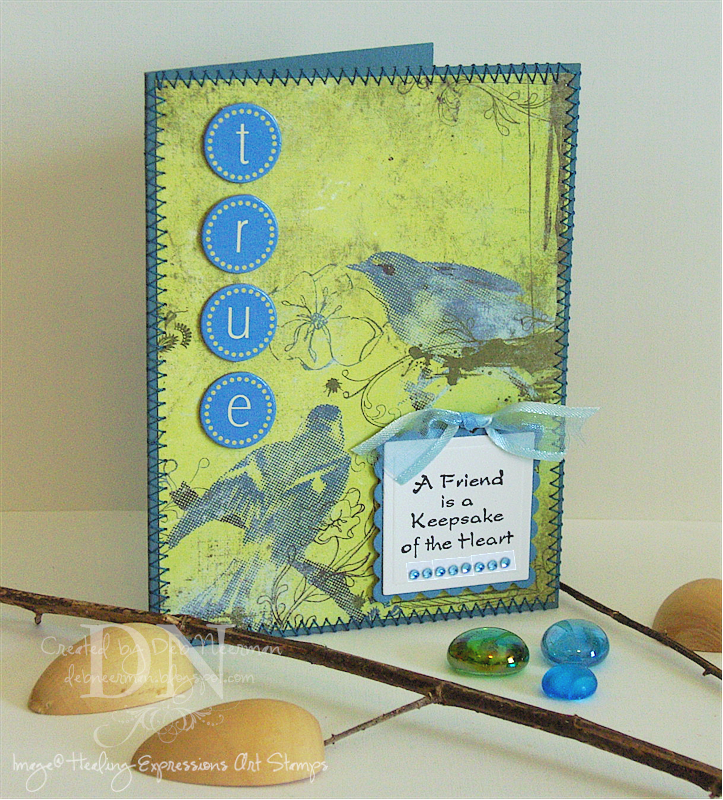
Today's 4 1/4" x 5 1/2" side-folded card was created in 15 Minutes using Stampin' Up! Blue Bayou card stock. I adhered a 4" x 5 1/4" piece of designer paper, then quickly zig-zag stitched the paper to my card base with my trusty old Kenmore.

I stamped my sentiment on white Xerox 110# card stock using Palette Hybrid ink. I cut the sentiment and the scallop background mat using the Cuttlebug and dies from the Nestabilities Large Square sets.

One of the things I love about using these stamps with the Nesties is all the white space around the text, giving you lots of room for something shiny, or sponging, or for stamping curlique's. I decided to embellish the 'white' area with turquoise faux rhinestones. Lot's of possibilities ...

Using some circular alphabet tiles (sent to me by my BFF!), I spelled out the word 'true' and adhered them to the card front using dimensionals. You know, for the shadows ... you must do it for the shadows!

Finally, I tied a pretty organza ribbon on a frame hanger and tucked it under the stamped sentiment. Easy peasy and ready to enjoy in only 15 Minutes!

Ingredients:

  • Textured Card Stock: Blue Bayou (Stampin' Up!)
  • White Card Stock: Xerox 110#
  • Designer Paper: Periphery Collection (Basic Grey)
  • Stamp: "A Friend is a Keepsake" (Healing Expressions Art Stamps©)
  • Ink: Palette Hybrid 'Noir' (Stewart Superior)
  • Adhesive: Dimensionals (Fiskars); Tape Runner (Tombow Mono)
  • Ribbon: Blue Organza (May Arts)
  • Accessories: Frame Hanger (Unknown, Found in Mt. Brad); Circle Alphabet Tiles (Unknown; found in Mt. Letter Tiles); Faux Rhinestones (A-Muse)
  • Tools: Cuttlebug Die Cut Machine (Provo Craft); Nestabilities Dies (Spellbinders); Sewing Machine (Kenmore)

For a real visual treat, be sure to stop by Lani's eBay store, Healing Expressions, and see her amazing artwork ... and while you're there, take a peek at some of the other beautiful sentiment stamps Lani has available.

Thanks for sharing part of your day with me!

~Hugs, Deb