Monday, July 14, 2008

A Basket Full of (Edible) Flowers ='s Two Challenge Entries

Pin It


Okay, the reason I put "edible" in the post title ^, is because: 1.) nasturtiums actually are edible ... (they're supposed to be nasturtiums ... please humor me); and, b.) I'm tryin' to qualify for this week's One Powerful Hour blog challenge. Oh, and also for Sharon's "Stamp Simply" challenge. Sharon's theme this week is to "Give Thanks," which has nothing to do with edible flowers but has everything to do with the sentiment I stamped. So, today's card project is a twofer!

I just discovered (Annapurna hooked me up), One Powerful Hour's challenge blog and I love the ground rules: you must complete your piece from start to finish in just 1 hour, including cleaning up after yourself. Since I'm the self-appointed Queen of the 15 Minute project, I had to play along. This week's theme is "Food and/or Beverage" ... hence, the edible flowers.

I created my "basket" by weaving Bazzill card stock strips together ... like we did in first grade, 'member? Then, using various craft punches, I created the flowers and leaves and glued them down on the card stock.

Here's a closer look:
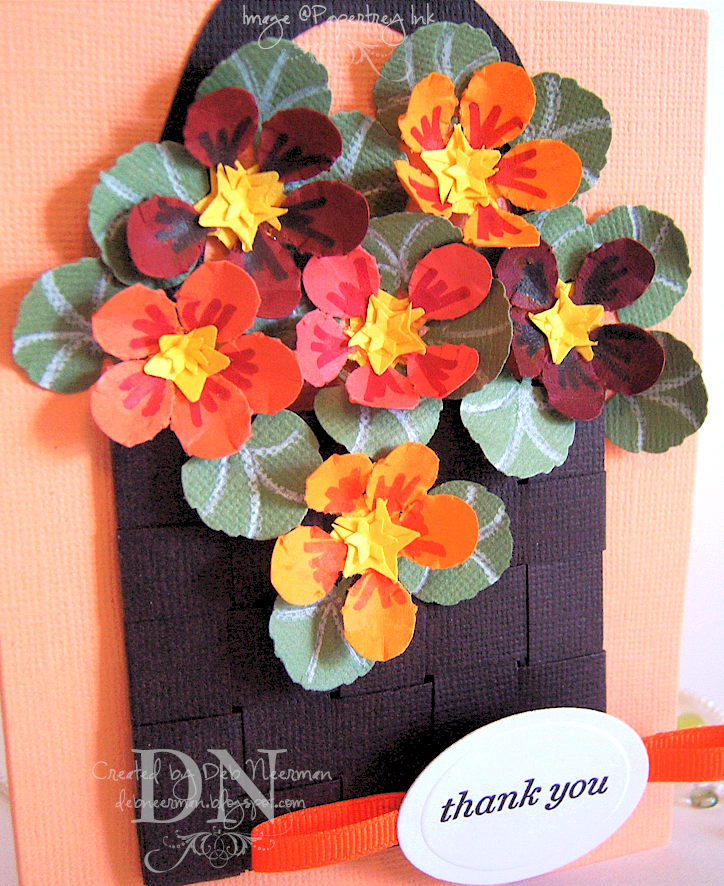
Or, for a ginormous look, simply click on the image.

My sentiment was stamped on Xerox 110# card stock using a stamp from Papertrey Ink using Timber Brown Staz-On solvent ink, die cut it, and mounted it on a piece of looped ribbon.

Tomorrow, I'll give you all the details regarding what Julie Koerber and I have hatched up ... so, check back then ... and make note of what CD you're listening to in your home, car, or studio, okeedokee?!?

Thanks so much for spending part of your Monday with me; YKYR!

~Hugs,


Card Stock: Bazzill Basic, DCWV, and Xerox 110#; Stamp: Papertrey Ink; Ink: Staz-On; Pencil: Prismacolor; Markers: Zig; 1/4" Grosgrain Ribbon; Die: Large Classic Oval Set by Spellbinder's; Die-Cut Machine: Cuttlebug by Provo Craft; Various Craft Punches; Adhesives: Scotch ATG 714 and "The Ultimate" by Api


Saturday, July 12, 2008

Just Because ... Because it's a Blog Challenge Entry!

Pin It


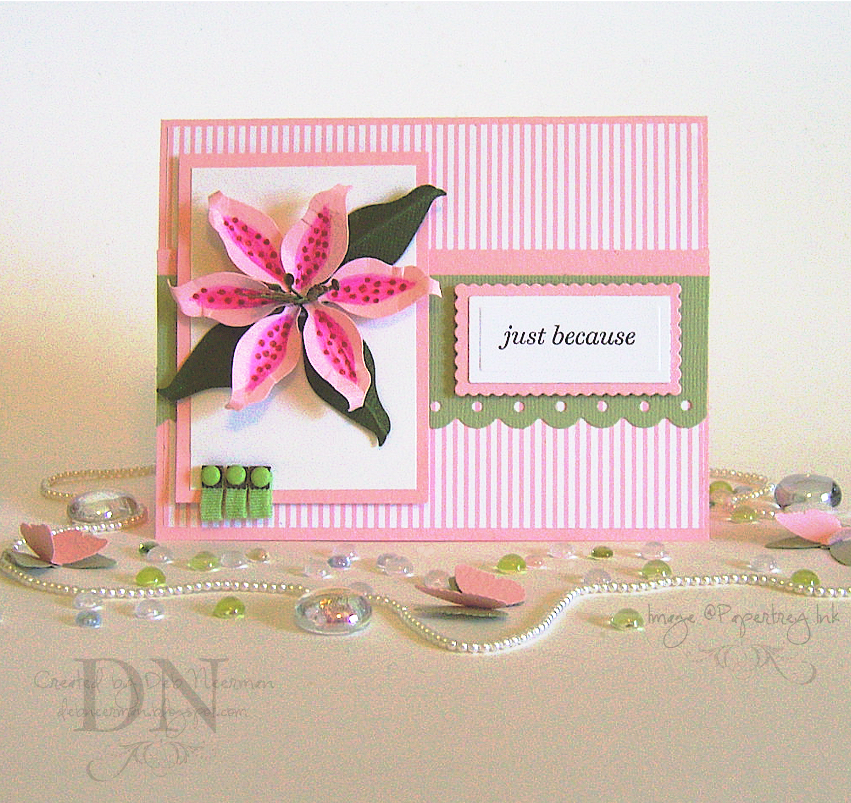
Today's card project was created for the July edition of Poetic Artistry's "Mojo Madness" blog challenge. For more details on Julee's challenge, or to see the sketch I followed, click HERE.

I made a tiger lily using pink Prism card stock, shading with Twinkling H2O's, then dotted the petals with a Zig marker. The leaves and the stamen were created using Bazzill cardstock in "Ivy."

I stamped my sentiment with "Timber Brown" ink on Xerox 110# card stock, cut it out and embossed it using the smallest die from "Megabilities" Long Classic Rectangle set. I matted the sentiment on a scrap of pink die-cut card stock and, using black dimensionals, adhered the matted sentiment to Bazzill card stock and cut a border using a Fiskars punch.

I matted my flower, added three ribbon brads from Hot Off the Press, and finis!

Thanks so much for sharing part of your busy day with me; YKYR!

~Hugs,


Card Stock: Prism and Bazzill Basics; Designer Paper: Making Memories; Stamp: Papertrey Ink; Ink: "Timber Brown" Staz-On; Color Medium: "Blushing Rose" Twinkling H2O's, Zig Marker; Ribbon Brads: Hot Off the Press; Dies: Long Classic Rectangle and Long Classic Scallop Megabilities by Spellbinder's; Border Punch: "Threading Water" by Fiskars; Die-Cut Machine: Provo Craft; Adhesive: Scotch ATG 714, Black Dimensionals, and "The Ultimate" by Api

Friday, July 11, 2008

Enjoy Simple Pleasures ... A 15 Minute Project

Pin It


Happy Friday, everyone!

Today's "15 Minute" project was created in a flash using die cuts and an easy-to-color image from Hero Arts.

I stamped my image on Xerox 110# card stock, then colored it with Koh-I-Noor pencils, blending with Gamsol.

I matted the stamped image using black dimensionals on dark brown card stock cut with a Large Rectangle Die. I also die cut two brackets from the Cuttlebug "Olivia" alphabet set and used my slit punch to create a scalloped edge.

Finally, I applied two antique copper metal photo corners; to keep them from floppin' around on my card, I clipped the prongs off and glued them down to my card front.

Easy-peasy and ready to serve in just 15 Minutes!

Thanks so much for sharing part of your day with me; have a great weekend!

~Hugs,


Card Stock: Bazzill, Xerox 110#; Stamp by Hero Arts; Ink: "Black Soot" Distress Ink by Ranger; Color Medium: Koh-I-Noor Woodless Coloured Pencils; Gamsol by Gamblin; Paper Stump by Creative Mark; Dies: Large Classic Rectangle and Large Scallop Rectangle by Spellbinder's; Bracket Die: "Olivia" Alphabet Set by Provo Craft; Metal Photo Corners: Unknown, found in Mt. Photo Corner; Slit Punch: Stampin' Up!; Die Cut Machine by Provo Craft; Adhesives: Scotch ATG 714, Black Dimensionals, Scrap Fusion by Ivy Scraps, and "The Ultimate" by Api

Thursday, July 10, 2008

"Words, Words, Words" ... a 15 Minute Project

Pin It


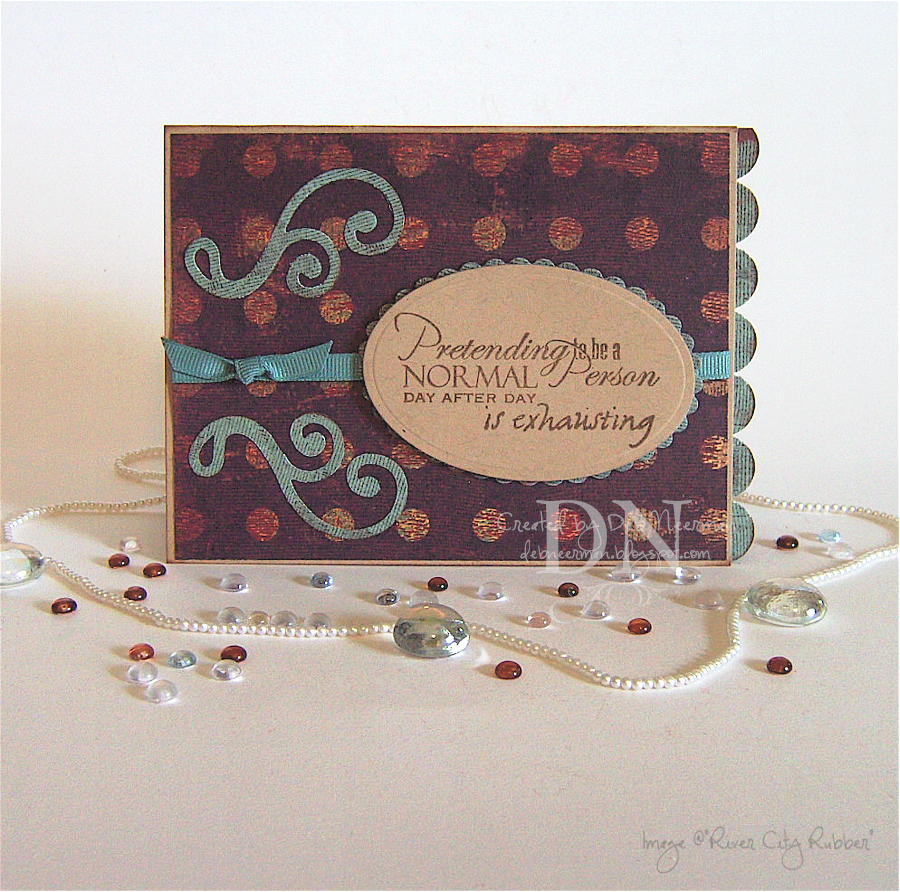
Today's card project was created for Allison's "Suggestive Sunday" blog challenge. This week, Allison's challenge required that you create a card using just one sentiment stamp ... no other stamps allowed.

I decided that this challenge was the perfect opportunity to show some love to this kewl sentiment stamp from River City Rubber Works. Soooo, I loved it with "Burnt Umber" hybrid ink, stamping on Kraft card stock.

I used designer paper from Cosmo Cricket's "Souvenir" collection for my main mat, cutting some flourishes and a scalloped edge mat for the sentiment from the reverse side of the same paper. Using my slit punch, I created a matching scallop border, attaching it inside the card.

I adhered a ribbon around the card, tied a scrap of matching ribbon on for a bow, inked up all my edges, and finis! Easy-peasy and ready to serve in just 15 Minutes!

Couple of things: Julie "Jewels" Koerber and I have put our heads together and are working on a fun project to share with all of you. Look for an announcement on our blogs very soon!

Also, Julie has also made the top 20 finalists in PaperCrafts magazine's "Gallery Idol" contest!! Please visit PaperCrafts web site and cast your vote for the amazingly talented Julie. Simply click HERE, (you'll have to scroll down a bit; Julie's ID is "outtoimpress"), to see all the top finalists' cards and to vote. Congrats, Jewels: YKYR!!!!

Thanks so much for sharing part of your day with me ... I really appreciate your visits and your comments. You guys rock!

~Hugs,


Card Stock: Bazzill; Designer Paper: "Souvenir" Collection by Cosmo Cricket; Stamp: "Pretending to be Normal" by River City Rubber Works; Ink: "Burnt Umber" Palette Hybrid by Stewart Superior and Colorbox "Chestnut Roan" Fluid Chalk Ink by Clearsnap; Ribbon: Unknown, Obtained in a Ribbon Share; Classic Petite and Scallop Petite Oval Dies by Spellbinder's; Flourishes Die by Sizzix; Slit Punch: Stampin' Up!; Die-Cut Machine by Provo Craft; Adhesives: Scotch ATG 714 and "Scrap Fusion" by Ivy Scraps; Black Dimensionals: Unknown, Obtained in a Sticky Share

Wednesday, July 9, 2008

On the Farm ... A "15 Minute" Project

Pin It


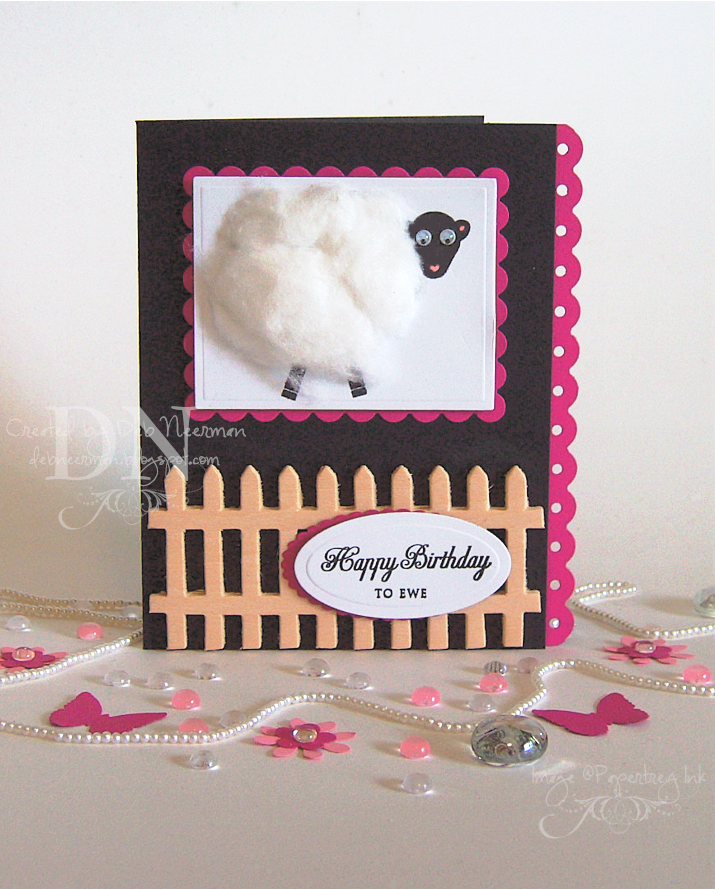
Today's "15 Minute" card project was created super-fast for the Caardvark's "On the Farm" challenge. This week, the 'Varks challenge called for a paper project created with a "farm" theme.

Using stamps from Papertrey Ink's "My Punny Valentine" collection, I stamped the sheep and the sentiment on Xerox 110# card stock.

I gave the sheep two googly eyes, some funky pink lips, and filled in her body with lots of fluffy cotton balls; that is one fat ewe, boys and girls!

The wooden fence was glued down to my Bazzill "Raven" card stock and I added a scalloped edge to the card using Fiskars' "Threading Water" border punch.

I cut a couple of fuchsia mats in the 'Bug, mounted them on black dimensionals and voila! A farm-themed birthday card ... just for 'ewe!'

Thanks so much for sharing part of your busy day with me; YKYR!!

~Hugs,


Card Stock: "Raven" by Bazzill, Fushia by DCWV, and Xerox 110#; Stamps: "My Punny Valentine" Collection by Papertrey Ink; Ink: "Black Soot" Distress Ink by Ranger; Color Medium: Copic Marker; Googly Eyes: Darice; Wooden Fence: Darice; Border Punch: Fiskars; Large Classic Rectangle, Large Scallop Rectangle, Petite Oval, Petite Scallop Dies all from Spellbinder's; Die-Cut Machine: Provo Craft; Adhesive: Scotch ATG 714 and "The Ultimate" by Api; Black Dimensionals: Unknown, Obtained in a Sticky Share

Tuesday, July 8, 2008

Make it Girly!

Pin It


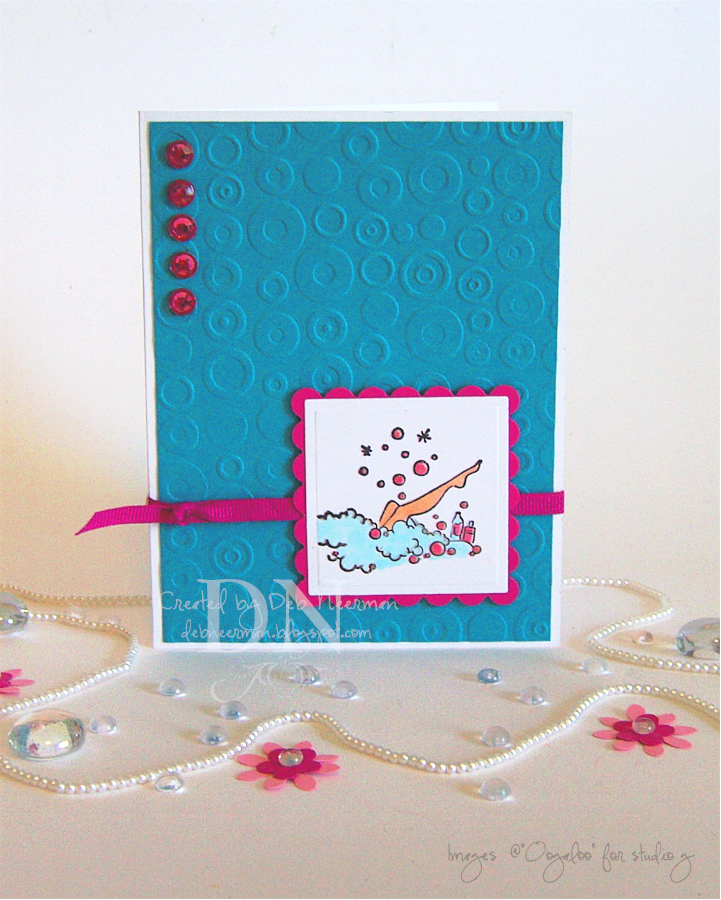
Today's "15 Minute" project was created for Sharon's "Make it Girly" blog challenge. This week, Sharon asked that we create a card that is "soft and girly." I chose this image 'cuz a bubble bath is pretty dang "girly" to me ... although I'm sure that lots of men indulge in a bit of the bubbly every now and then!

As always, for a ginormous larger view, simply click on the image.

I stamped my image on Xerox 110# card stock and colored it in with Copic markers. I added just a hint of glitter to some of the bubbles but I'm afraid it really doesn't show in my photo.

I used the "Spots and Dots" Cuttlebug embossing folder for my background, cut a scalloped-edge mat, tied a ribbon around and through the card, and added five sparkly rhinestones.

This card will go in to my stash; I'll stamp an appropriate sentiment on white card stock and mat it on matching card stock when needed. Easy-peasy and ready to serve in just 15 Minutes!

Thanks so much for sharing part of your busy day with me; YKYR!

~Hugs,


Card Stock: Xerox 110# and DCWV; Stamp: Oogaloo for studio g; Ink: "Black Soot" Distress Ink; Glitter Pen by Sakura; Rhinestones: Darice; Ribbon: Unknown, Obtained in a Ribbon Share; Embossing Folder: "Spots and Dots" by Provo Craft; Die-Cut Machine by Provo Craft; Large Classic Square and Large Scallop Dies by Spellbinder's; Adhesive: Scotch ATG 714 and Scrap Fusion by Ivy Scraps

Monday, July 7, 2008

Happy Birthday, Allison!

Pin It


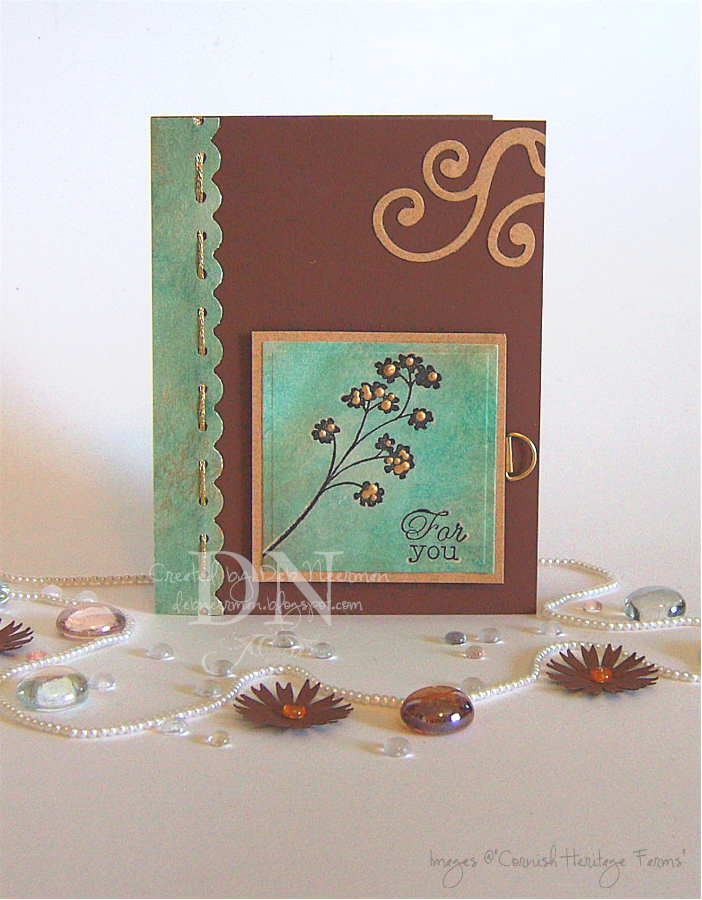
Today's card project was created for the 7th anniversary of Allison's 29th birthday! Soooo, Allison, this card's for you!!

I created the focal images by loading my stamps with Versamark watermark ink, followed by black Distress ink, then stamping on Xerox 110# card stock. Next, I embossed the images with clear embossing powder.

When cool, I sponged on Water Lily Green and Orangerie hybrid ink, then gently rubbed the inks off the embossed portions. I did the same on a large scrap piece of card stock to create the matching scalloped edge.

I wove gold metallic floss through the holes in the scalloped border and cut a flourish and a matching mat.

Finally, I added some gold Liquid Pearls to the blossoms and attached a gold frame hanger and finis!

BTW, several of us schemed to wish Allison a happy birthday today. If you'd like to check out the cards created by the other bloggers who participated, click on the following links:

Anna;
Theresa;
Smriti;
Jackie;
Mel;
Tina;
Monica;
Zarna; and,
Risa

Thanks so much for sharing part of your busy day with me ... and many happy returns of the day, Allison!!

~Hugs,


Card Stock: Xerox 110#, Bazzill, and CutCardStock; Stamps: "Nature Silhouettes" by Cornish Heritage Farms; Inks: Versamark Watermark Ink, "Black Soot" Distress Ink by Ranger, and Palette Hybrid; "Gold Pearls" Liquid Pearls by Ranger; Clear Embossing Powder: Unknown; Gold Metallic Embroidery Thread by DMC; Gold Frame Hanger: Unknown; "Threading Water" Border Punch by Fiskars; "Swirls" Die by Sizzix; Large Classic Square Die by Spellbinder's; Die-Cut Machine by Provo Craft; Adhesive: Scotch ATG 714 and Scrap Fusion by Ivy Hollow; Dimensionals: Unknown, Obtained in a Sticky Share


Sunday, July 6, 2008

An Award Received ... and Passed On

Pin It


Aren't Awards fun!?!?! Well, of course they are! First, I'd like to thank the long-suffering DH, Mom, Dad, and, of course, the Academy ...

Anyway, I received this very kewl blog award from my two of my best imaginary bloggin' friends, Anna, and Tonniece.

And I've been sworn under penalty of law to pass it on to seven bloggers that I think are brilliant. So, in no apparent order, I'd like to pass this on to:

Jewels; Allison; Julee; Julie; Jennifer; Anne; and, Aimee!

As you can see, if your first name doesn't start with a J or an A, you're S.O.L. So, Chris, Risa, Nettie, Kathi, Lani, and Kathy: so sorry 'bout the names you've been given! LOLO, I kid ...

Hope you're enjoying a relaxin' and creative Sunday ... I'll be back tomorrow with a project or three for you to CASE!

~Hugs,


Saturday, July 5, 2008

15 Minute Project ... Using the "Glimmer Mist Resist" Technique

Pin It


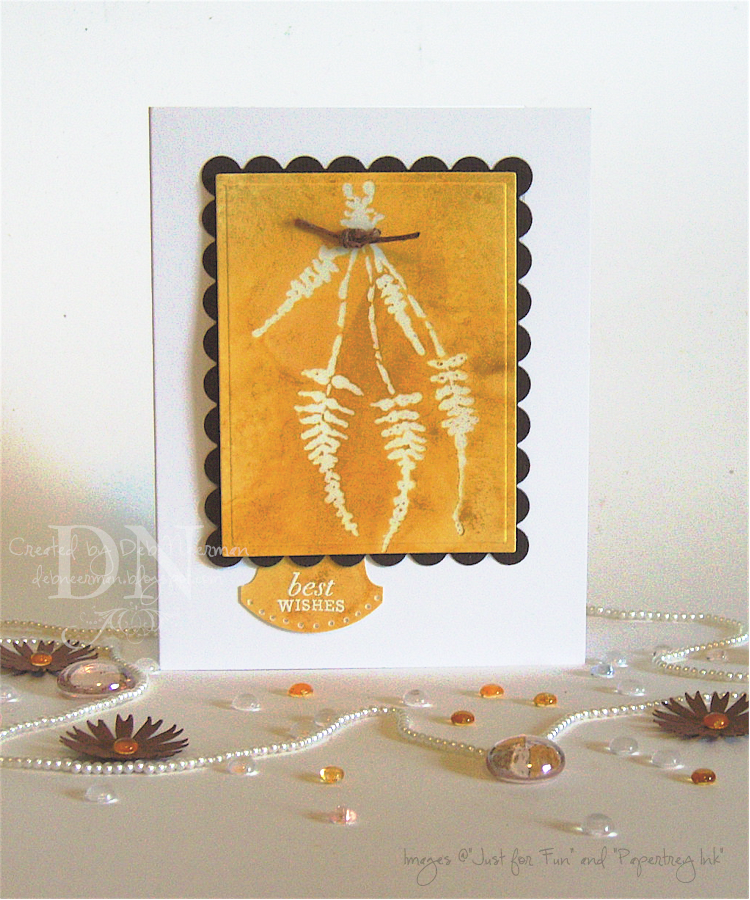
Today's "15 Minute" card project was created using clear embossing powder and gold Glimmer Mist by Tattered Angels. If you'd like a ginormous larger view, simply click on the photo.

I have several spray bottles of Glimmer Mist and never remember to use it ... sooooo, I decided to try to create a resist using the Mists with a clear embossed image. I know you have some Glimmer Mist in your studio too, so drag it out and let's create some kewl clear resist backgrounds!

First, I stamped my primitive herb image with Versamark on Xerox 110# card stock. I then placed the stamped image in a shoe box and sprayed heavily with gold Glimmer Mist. Really soak your card stock ... and allow the Glimmer Mist to pool up around the clear embossed image; doing so creates some really interesting patterns!

Allow the card stock to dry overnight ... then simply use a slightly damp rag to gently wipe the Glimmer Mist off the embossed image and voila!

Using a scrap of the Glimmer Mist(ed) card stock, I punched out a round file tab, then embossed my sentiment using white embossing powder. I used my piercing tool to punch little holes around the bottom edge of the file tab and went over the holes with a white Sharpie paint pen.

I punched two tiny holes on either side of the herb swag and, using wax linen thread, tied a square knot.

Finally, I cut my image out using Nesties in the Cuttlebug, then mounted it using black dimensionals on a dark brown scallop edge mat. TIP: Try mounting your card stock mats using black dimensionals; they "disappear" on your project.

I'd love to see what you create using the clear embossing resist technique with Glimmer Mists. Link up your creation in the comments so everyone can check out your creation!

Hope you're having a relaxin' and creative weekend; thanks for sharing part of it with me!

~Hugs,


Card Stock: Xerox 110#, Bazzill; Stamps: "Herb Swag" ... I made that up; I don't know what the name of this stamp is, but it's manufactured by Just for Fun ... Sentiment stamp by Papertrey Ink; Versamark Watermark Ink; Gold Glimmer Mist by Tattered Angels; Sharpie Paint Pen; Clear Embossing Powder: Unknown, I store all my clear emobossing powder in a covered plastic box ); White Embossing Powder by Powder Keg; Waxed Linen Thread by 7gypsies; Piercing Tool by Making Memories; Round File Tab Punch by Stampin' Up!; Large Classic Square Rectangle Die and Large Scallop Rectangle Die by Spellbinder's; Die-Cut Machine by Provo Craft; Adhesive: Scotch ATG 714; Black Dimensionals: Unknown, Obtained in a Sticky Share


Friday, July 4, 2008

Happy 4th of July!

Pin It


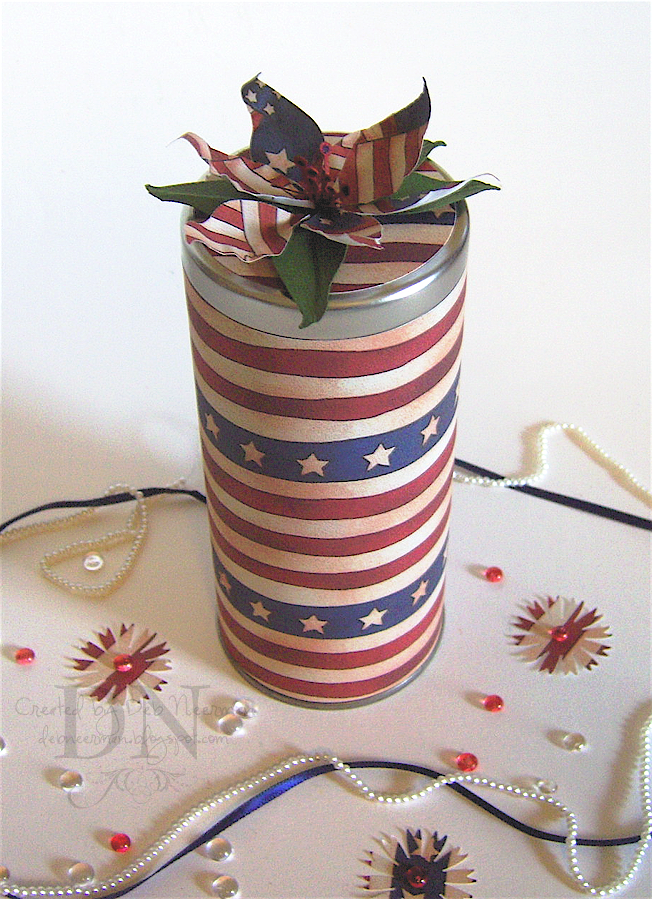
Today's project was created super-fast using a food-quality tea tin and some patriotic-looking designer paper. Oh! And chocolate sticks ... the most important part of all!

FYI, Hershey's yummy chocolate sticks fit inside perfectly ... but you can fill your tin with jelly beans, gummy bears, or small explosives.

I purchased this tea-tin for super-cheap HERE, then covered them in designer papers from Daisy D's. You can embellish your tin as much or as little as you'd like.

Using a theme-punch, I created a never-seen-in-nature flower for the top of the tin using the same papers and some scraps of Bazzill card stock.


This super quick-to-make treat makes a great hostess gift ... or an even better gift for YOU! After I hoard share the chocolate, I'll use this tin in my studio to store colored pencils, markers, paint brushes, rulers, or scissors.

Hope you have a safe and happy 4th of July ... and take a minute to thank a veteran today.

Thanks so much for sharing part of your busy holiday weekend with me; you rock!

~Hugs,


Card Stock: Bazzill; Designer Paper: Americana Collection from Daisy D's; Tea-Tin: Speciality Bottle; Theme-Punch: Punch Bunch; Adhesive: Scotch ATG 714

Thursday, July 3, 2008

Thinkin' PINK ... In a Pink "Living Room"

Pin It


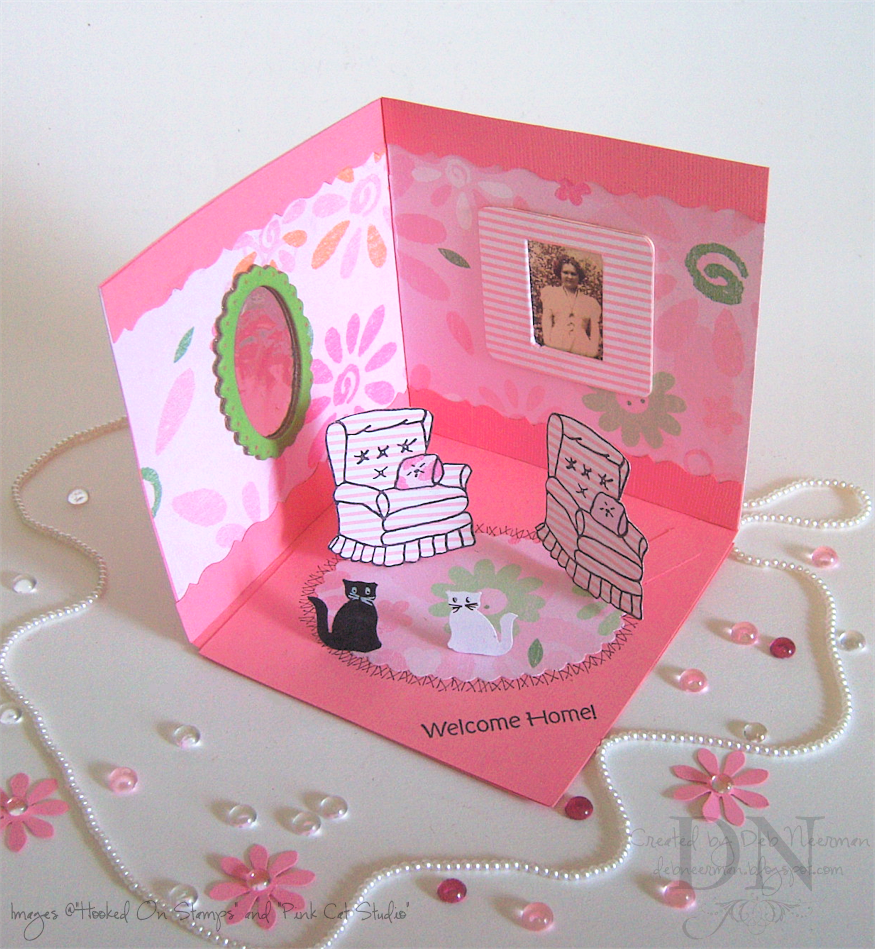
Today's way over-the-top card project was created for the Caardvark's "Think Pink" blog challenge. Hey, if it's pink you want, it's pink you'll get, LOL!

The card was created on a Bazzill card stock base, using designer papers from Deja Views and Making Memories.

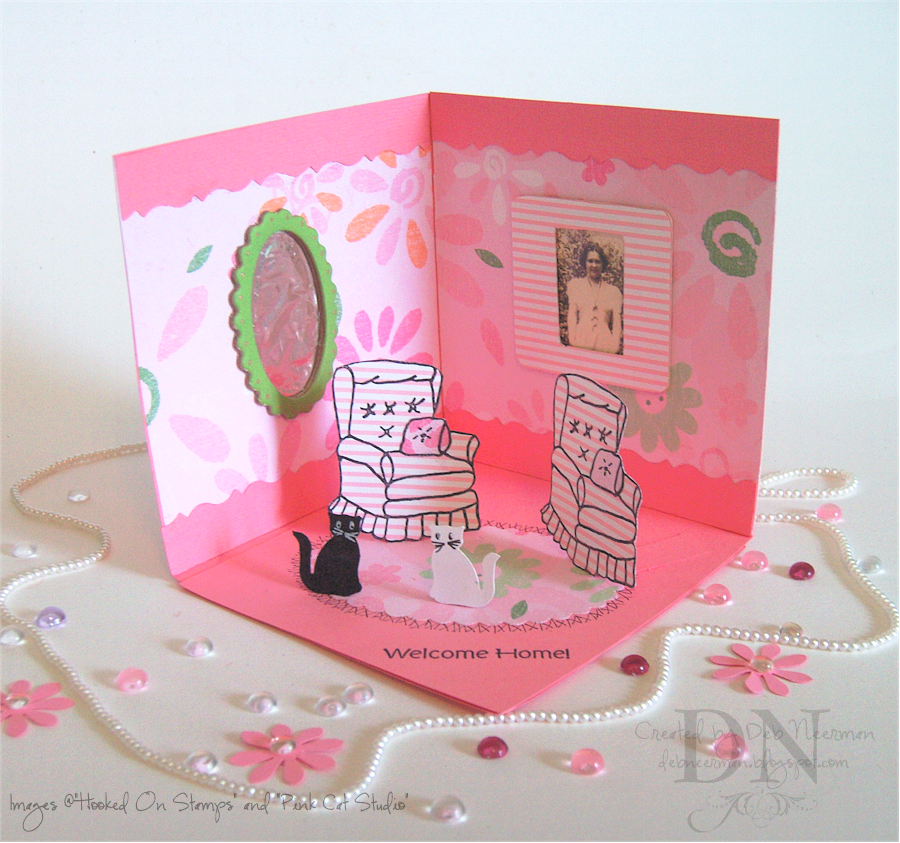
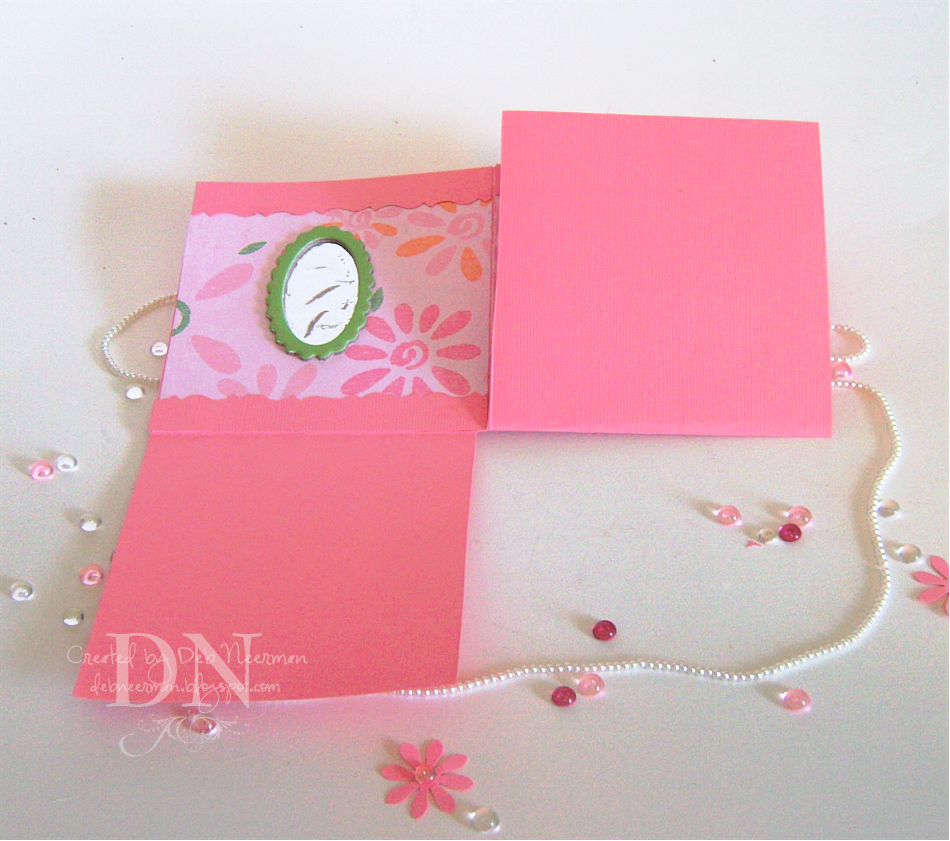
I stamped my chairs with an antique "Hooked On Stamps" stamp using Distress Ink, die-cut a scallop-edged "rug," mounted an original vintage (1920) photograph under a slide mount, created a "mirror" using a chipboard die-cut and tin foil, stamped my sentiment, and punched out two kitty images. Hey, what's a living room without two kitties?!?


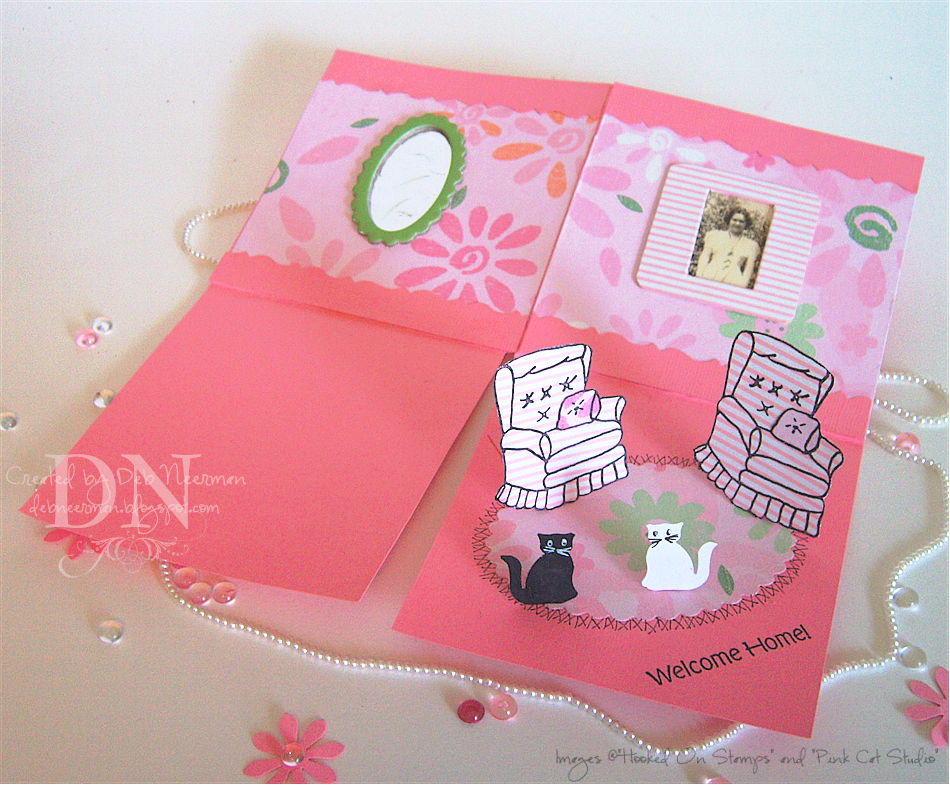
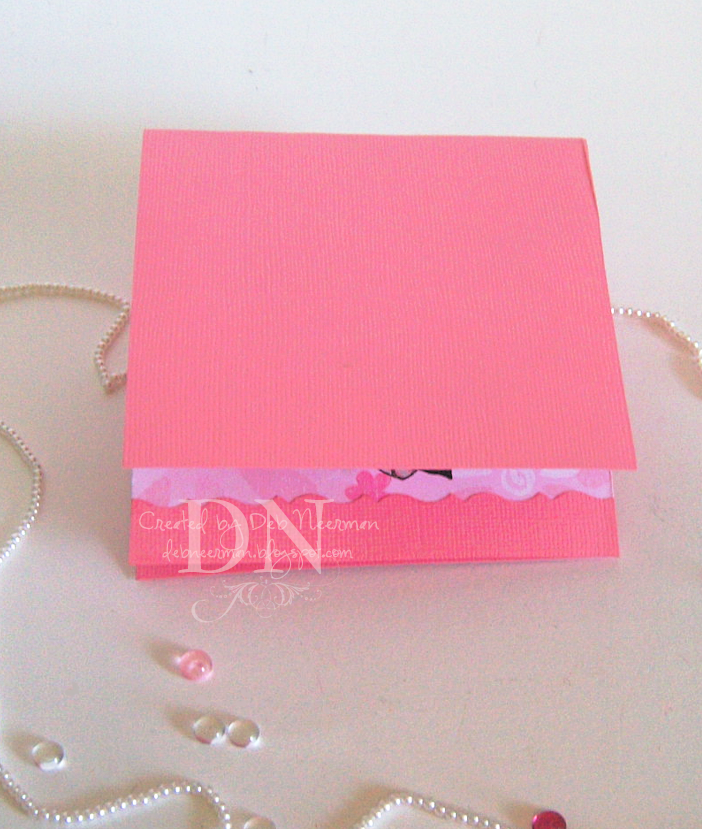
The photos below show how the card is folded up for mailing:

The chairs and the kitties are mounted to the card stock "floor" with paper hinges. Simply flip the dimensional objects forward:

And fold everything up in a tidy square!

This card is so a bit time consuming to make but so much fun ... and people (especially kids!), really seem to enjoy receiving a "room" card.

Thanks so much for sharing part of your busy day with me; you rock!

~Hugs,


Card Stock: Bazzill; Designer Paper: Deja Views, Making Memories; Stamps: Sentiment by Pink Cat Studio, Chair by Hooked on Stamps; Ink: "Black Soot" Distress Ink by Ranger; Vintage Photograph: Personal Collection; Vintage Slide Mount; Decorative Edge Scissors: Fiskars; Kitty Punch. Unknown; Die Cut Machine, Provo Craft; Nestabilities Die, Spellbinder's; Adhesives: Paper Fusion Glue, Scotch ATG 714


Wednesday, July 2, 2008

Oh, Canada! ... a 15 Minute Project

Pin It


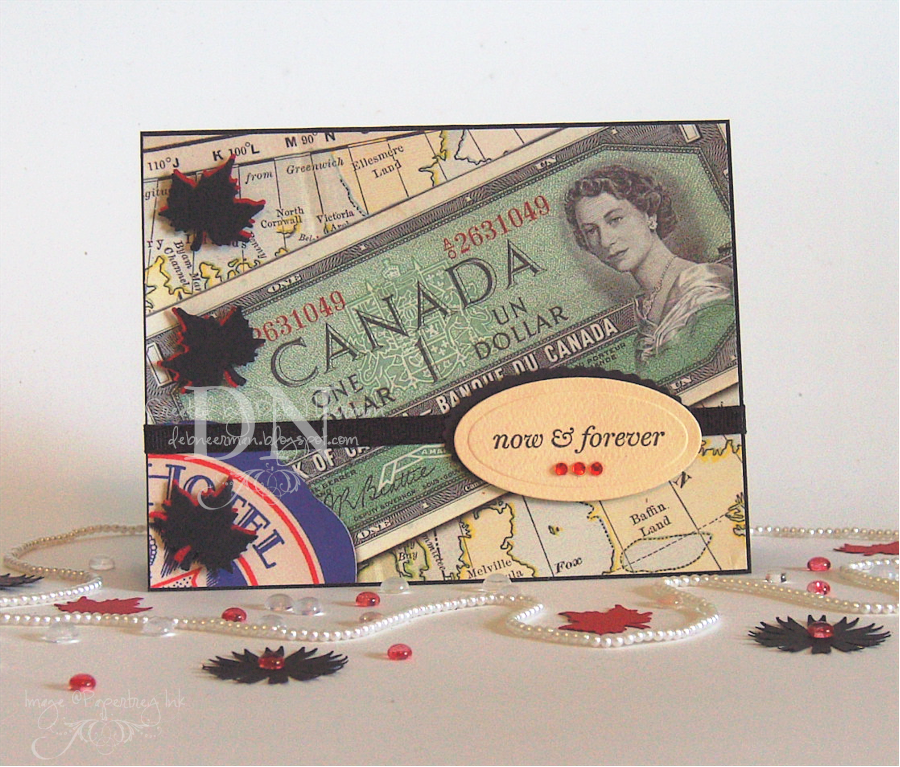
This card was created in a flash for Allison's "Suggestive Sunday" blog challenge. This week, Allison challenged us to create a paper project honoring Canada ... July 1st being "Canada Day" and all.

When I think of Canada, I think of breathtaking scenery, clean streets, pine-scented fresh air, North America's largest fresh water supply, a beautiful and moving national anthem, stoic Mounties, Anne Murray, and a dollar that USED to be worth less than the US dollar. Oh, and those cute little Canadian coins ... always such fun finding those in your wallet at an exact change toll booth!

The card was created on "Raven" Bazzill card stock using heavy weight DP from Paper Love Designs. Ummm, yeah, good luck findin' any more of this kewl card stock; Lord knows I've tried ...

I embellished the card using grosgrain ribbon, maple leaf punchies, and itty-bitty gems from A-Muse. My PTI sentiment was stamped using Distress Ink on a scrap of Crate Paper cut with a Nestie die in the 'Bug.

Oh, Canada! Bloomberg says your dollar is worth more than mine today ...

Thanks so much for sharing part of your busy day with me!

~Hugs,


Card Stock: Bazzill, Crate Paper; Designer Paper: Paper Love Designs; Stamp: Papertrey Ink, "Simple Little Things" Collection; Ink: "Black Soot" Distress Ink by Ranger Industries; Grosgrain Ribbon; A-Muse Gems; Maple Leaf Punch by EK Success; Dimensionals: All Night Media; Adhesive: ATG 714

Tuesday, July 1, 2008

Predicting the Future ... with Greeting Cards!

Pin It


Well, not exactly. But this is the very last card project I created before coming down with pneumonia. So, I mailed it to myself! And guess what? I feel better!

Ipso facto: a handmade, stamped greeting card will definitely make you feel better. And will give you fresh breath and strong, shiny hair, too!

And the iron lung reference (see post below), was a joke. I am, and have been, breathing just fine all by my lonesome. Anyway, I'm terribly sorry for the misunderstanding ... I DO have a strange sense of humor, huh?!?

This cute little card was created using an ancient (1996) matchbox stamp from Crafty One/Limited Edition, and a slide drawer-type match box:

I stamped my image on Funky Vintage designer papers from Making Memories, then cut everything out, gluing the "comforter" on to the match box. I colored my Teddy bear with Koh-I-Noor pencils, blending with Gamsol and a paper stump.

I stamped my sentiment on Bazzill card stock, cut some mats using rectangle and heart-shaped Nestie dies in the Cuttlebug, and tied some funky fiber around the fold.

Here's a peak at the goodies tucked inside the drawer:

The tiny teddy and the little book are part of the stamp but you could certainly add more fun little things to make your little sickie smile. Like penicillin ...

Now that I'm startin' to feel like my middle-aged old self again, I expect to get back into the swing of things soon: participating in my sweet friend Allison's weekly challenges, lots of e-ing with my pal, Annapurna, return-comment blurfing, admiring everything Jewels creates, stalking SCS, and visiting your blog.

THAT should keep me outta trouble for a while!

Thanks for spending part of your busy day with me; you rock!

~Hugs,


Card Stock: Bazzill, DCWV; Designer Paper: Making Memories, Funky Vintage "Lizzie Collection"; Stamps: Matchbox Marvels by Limited Edition/Sentiment: Papertrey Ink; Dye Ink: Distress Ink "Black Soot" by Ranger Industries; Color Medium: Koh-i-Noor Woodless Pencils; Fiber: Unknown; Die Cut Machine by Provo Craft; Dies by Spellbinder's; Gamsol by Gamblin; Paper Stump: Creative Mark; Adhesive: ATG 714 and "The Ultimate" by Api
Thursday, June 26, 2008

Reports of My Death Have Been

Pin It

Somewhat Exaggerated ...

So, hello there boys and girls! Hope all is well in your corner of the world.

My keepers have decided to free me from my P.I.L (Portable Iron Lung) for a bit .. monthly maintenance and what not, so I thought I'd post a quick note here to say hello there!

When last we met here, I was happily (and healthily, lol), enjoying a visit with the darlin' DG-K's. Here's a pix for you to 'oooooohhh,' and 'ahhhhhhhhhhhhh,' and 'aren't they cute?' over:


Anyway, next thing I knew, I was confined to bed (as if I could have stayed awake even if I wanted to), spiking fevers, and coughing my brains out. Literally: what a mess!

So, at the moment, even with all this fancy doctorin' stuff, no one can tell me what's wrong. The best explanation (or my favorite anyway), is this: It's a hybrid bronchial pneumonia. Hybrid, that sounds kewl, right?!?

I'm not sure when I'll post again but I'm so grateful for all the well-wishes and 'hey, there's' I've received from you. And lots o' special thanks to Anne and Jewels ... they know why.

And I'm totally jonesin' for my studio so I expect to be creatin' stuff again soon!!!

Oh. And the "Portable" Iron Lung Machine? Not so portable ...

~Hugs,

Tuesday, June 10, 2008

15 Minute Project ... A Card for Dear Old Dad

Pin It


Hi boys and girls, and welcome to the show!

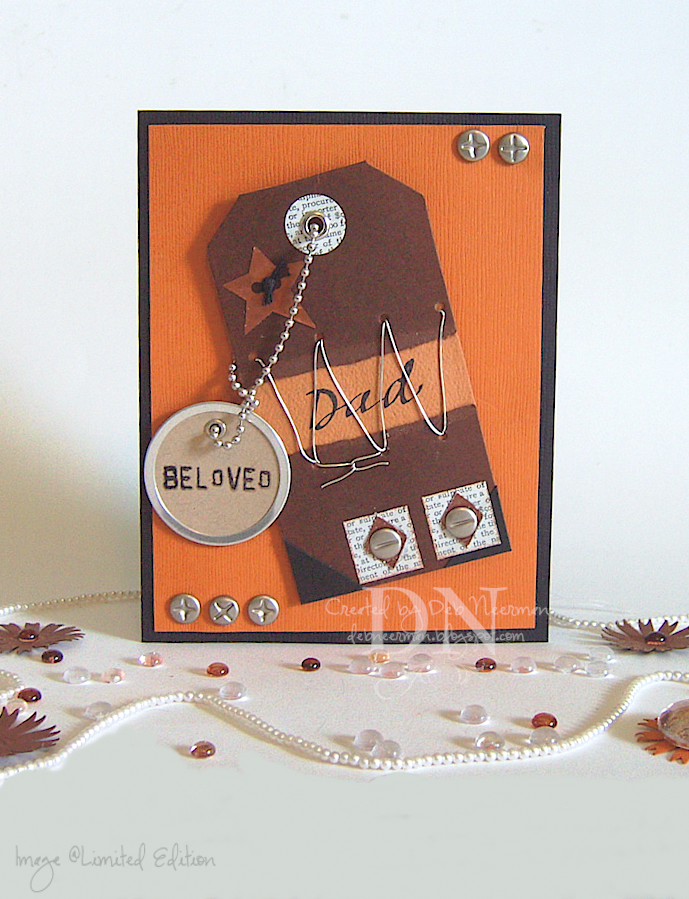
Today's "15 Minute Project" was created in a flash using a pre-made, three dimensional tag.

Creating masculine cards are usually challenging for most card makers ... myself included. I achieved a "manly" theme by adding some screwdriver head brads, a ball chain and connector, and removed the buttons that were standard-issue.

I punched a scrap of copper sheet metal to create the diamond shape and adhered them using more screwdriver brads. And I purposely left the twist in the ball chain to add some interest to this simple card layout.

I stamped my sentiment on Kraft card stock using Versamark and black distress ink, then clear embossed. I created a circle tag by using my Tag Maker and mounted the whole business on Bazzill textured card stock using dimensionals.

Easy-peasy and ready to serve in just 15 Minutes!

My DS, DiL, and the G-kids have big plans for me tomorrow so I prolly won't get to post ... but I promise to take some photos to share with you. And it's inescapable: y'all will be seeing pix of my beeeee-you-teeeee-full GK's!

Thanks so much for sharing part of your busy day with me ... and for all your comments and support! You guys rock ... and I {heart} y'all bunches!

~Hugs,


All Card Stock by Bazzill; Pre-Made Tag: "Fresh Tags" by Rebecca Sower for EK Success; Inks: Versamark and "Black Soot" by Ranger Industries; Clear Embossing Powder: Unknown (I just dump all my clear embossing powder in a tub-thingie); Stamp: Limited Edition; Tag Maker by Making Memories; Ball Chain (Available in my eBay store); Brads: Unknown (Found in Mt. Brad); Diamond-Shaped Paper Punch: EK Success; Copper Sheet Metal: Unknown; Dimensionals: Obtained in a Share; Adhesive: ATG 714


Sunday, June 8, 2008

WARNING ... I Stumbled Upon a Spoiler with NO Alert!!

Pin It


Well, I'm completely bummed!!! Here's why: a member of the stamping/card making/paper crafting community has posted the ending of the new Sex and the City movie!

I've been eagerly anticipating seeing SATC, and this 'news' really spoils the movie for me. Unfortunately, it hasn't arrived yet in my Cinema 1-147 ... or trust me, I'd have already seen it and I prolly wouldn't have had this (over) reaction, LOL.

But, I can't help but wonder (as Carrie would say), why someone would elect to do this NOW?!? I mean, the movie has only been released in the U.S. for a WEEK ... well, 9 days to be exact.

I can see throwing the movie spoiler on your blog say, four or five months after the movie opened. Not nine freaky-deaky days after it opens!


So, because I unintenionally had the movie ruined for me, I'm tryin' to save you from the same fate ... call it a Public Service Announcement. If you don't want to inadvertently discover the ending of SATC, you might want to say away from online forums, groups, and chat rooms till you get a chance to see the flick yourself.

And, if knowing the ending to the most highly anticipated movie since SATC went off the air doesn't bother you, well, then ... never mind ... and peace out.

Hey, I'll recover! I hope you're enjoying a nice Sunday with your beloved stamps family and thanks so much for visiting!

~Hugs,

Saturday, June 7, 2008

Tally Me Bananas? Umm, About $20 Each ...

Pin It


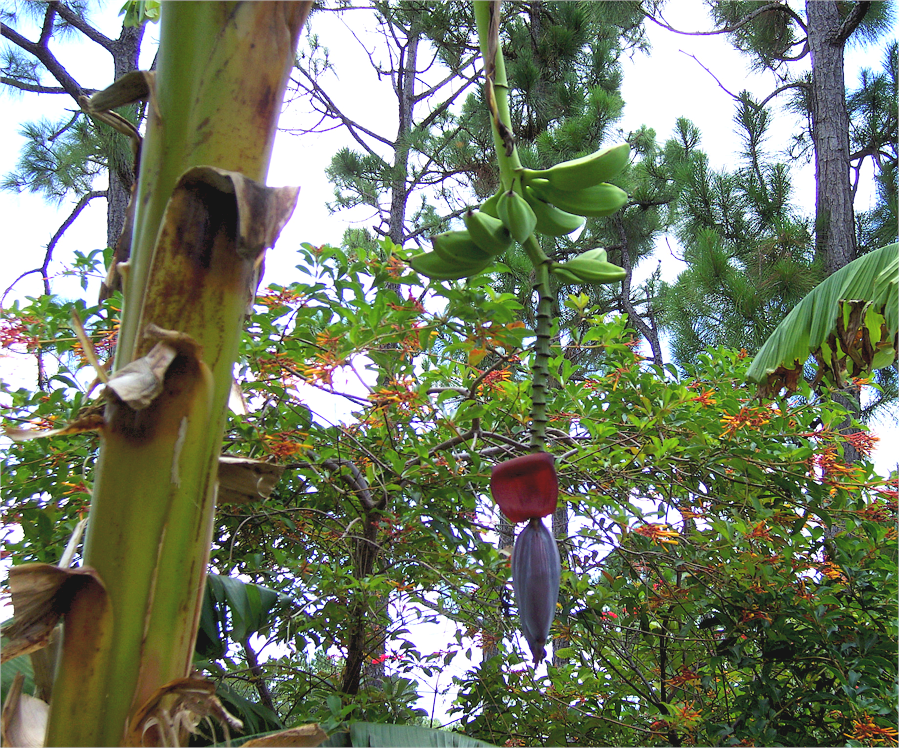
Due to popular demand ... okay, three people: a photograph of the Banana-Tree-That-Wouldn't-Bear-Fruit-Bearing-Fruit!

If you've been following along, I mentioned in an earlier post that our barren 8 year old banana tree had finally set fruit. After lakes full of water, a landfill's worth of compost, and enough banana tree fertilizer to feed a small country of banana trees, we finally have ... let's see ... looks like ten bananas!

I'm hoping that we get more, but using the current count, the bananas on this tree will have cost us approximately $200.00 ... or, $20.00 each. These better be some fine bananas!

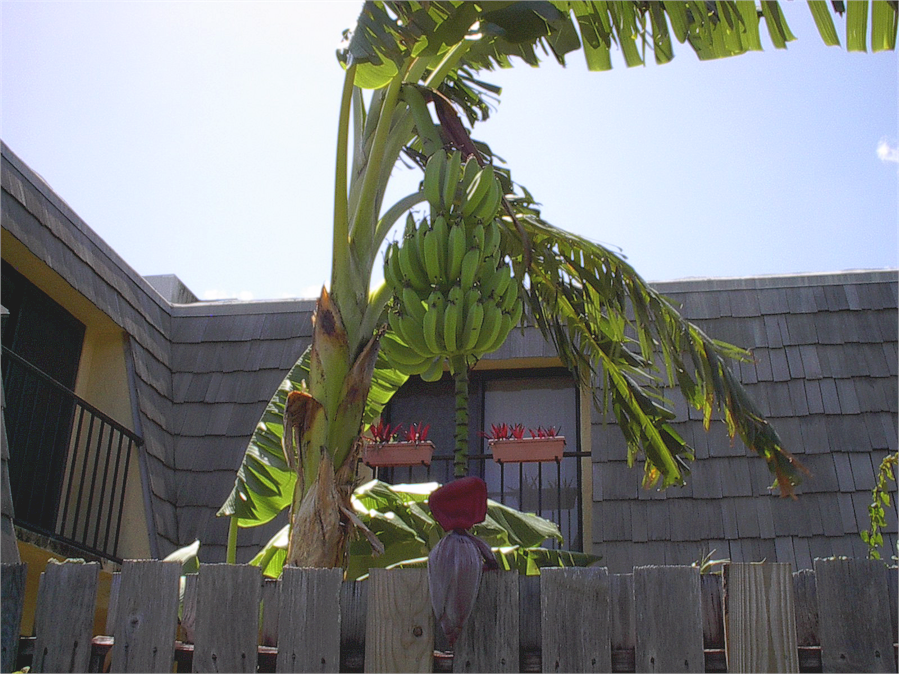
Now, here's a photo of my banana tree's Momma:

WoWZa! Look at that big o'le bunch of bananas!

This tree was grown in Boynton Beach in about 3 square feet of soil ... well, sand ... and no compost, or fertilizer, had ever been added to this giant's diet.

We go strictly by the book on this banana-farming thang and I get 10 lousy bananas?!?

Well, no matter what surprises the fates have in store for me, I'm guessin' that banana tree farming isn't goin' be one of 'em!

Hope you're having a great weekend and thanks for stopping by to laff and point at my banana tree.

~Hugs,


EDITED TO ADD: That bush in the background with the red and orange flowers? That's hummingbird bait. Yah, I'm gettin' a lot of them, too ...

Friday, June 6, 2008

OH, No She Didn't ... OH, Yes She Did!

Pin It


Happy Friday boys and girls, and welcome to your weekend!

I think you know (you know) how much all of you mean to me ... and how much I rely on you for honest advice, friendship, and moral support. We're all just one big happy stampin' family, right? Well, one of you had better come down here right now and slap me or something ... 'cuz I can't stop using the Walnut Ink Resist technique!

I'm sure I'm not the only one who love this technique ... although I'm prolly the only stamper you know who can't stop using it. I think it has to do with the almost magical process of clear embossing ... and the added wonder of how the ink will react to it. I can't wait to get to my studio the next morning to see how the ink dried. Perhaps I need more than a slap, yes?!? LOL!

This time I used the technique with this kewl old stamp from Just for Fun. I love the primitive look of the stamped image and it goes so well with the grungy/grubby/shabby look created by this technique. If you don't know how already, or if just like reading my blog entries, you can check out my instructions, HERE, for the Walnut Ink Resist technique.

And I just discovered that this card qualifies for Sharon's "Stamp Simply" challenge! This week, Sharon's challenge called for creating a project using a bold, or silhouette, stamp. Well, lookie, here; finally, a challenge entry I created and posted in a reasonable time frame. Which was totally by accident as I made this card yesterday ... w-a-y before I saw Sharon's blog post!

To create the little tie around the bunch of herbs ... or ferns, I punched a small hole on either side of the "bunch" and tied some white waxed linen through and into a knot. I added a smidgen of fluid chalk ink to the ends of the thread so they looked grubby too ... it's important to make everything on a grubby/grungy piece grubby/grungy too. I think ...

The only other things worth mentioning are: I used a scrap of the walnut-inked card stock to punch a round file tab ... I stamped my sentiment with Versamark, embossed with white powder, and pierced some itty-bitty holes around the edge. Oh. And I dotted the holes with a Sharpie Paint Pen.

Tomorrow, I'll post up a photo of my newly fruited banana tree! See how the excitement just never ends?!?!? I don't know how I stand it ...

Thanks so much for sharing part of your busy Friday with me ~ have a great weekend!

~Hugs,

Card Stock: Xerox 110#, Bazzill; Stamps: Herb Swag (I just made that up; I don't know it's name) by Just For Fun, Sentiment Stamp by Papertrey Ink; Ink: Versamark; Fluid Chalk Ink: Clearsnap; Walnut Ink: 7gypsies; Embossing Powder: Powder Keg; Sharpie Paint Pen; Fiber: Waxed Linen Thread by 7gypsies; Die Cut Machine by Provocraft; Dies by Spellbinder's; Punch by Stampin' Up!; Piercing Tool by Making Memories; My New-and-I'm-In-Love-Black-Hexagon Dimensionals: Unknown, Obtained in a Sticky Share; Adhesive: ATG 714

Thursday, June 5, 2008

Burn Baby, Burn ... A Blog Challenge Entry

Pin It


Today's card project was created for Allison's "Suggestive Sunday" blog challenge ... yup, late again! This week, Allison challenged us to "burn" part of our project ... yippee, we're playin' with matches! Or, as in my case, wood-burning tools.

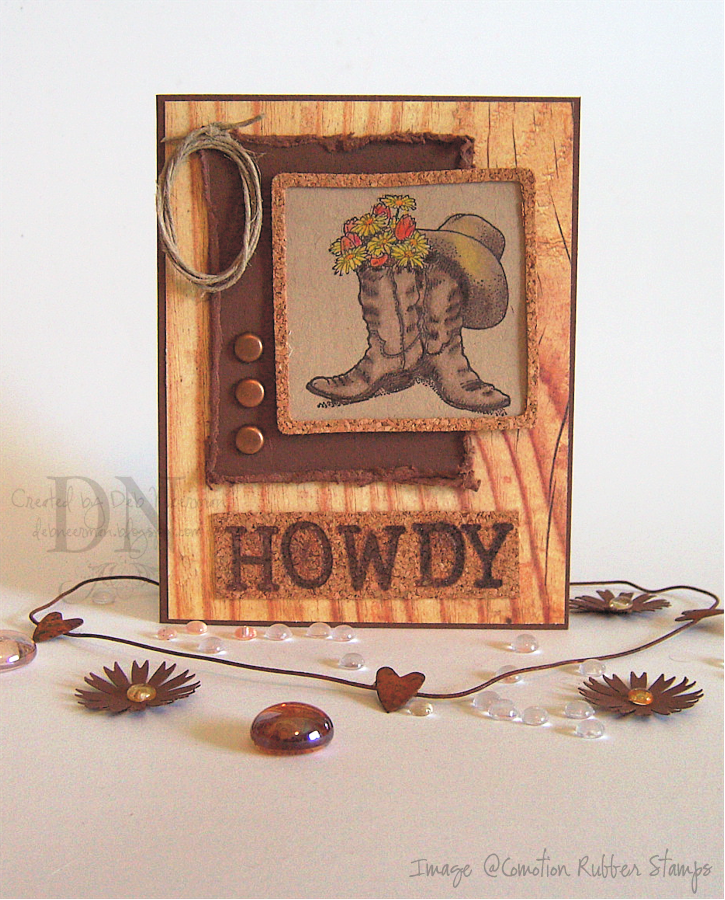
I heated up my very old (and lonely) friend, Walnut Hollow's Creative Versa-Tool, and burned my sentiment into adhesive-backed cork using Walnut Hollow's "Hot Stamps" alphabet set. I bought this alphabet set on clearance at Joann Fabric in Royal Palm Beach for $2.97!! 'Cept this was some time last year, so don't y'all go rushin' out to Joann's clearance rack. I also grabbed the "Hot Numbers & Punctuation" set for the same price; which is a huge mark-down from their normal price of $26.00 ... each!

I stamped my focal image on Bazzill Kraft card stock using Staz-On ink, and die cut a little cork frame to fit around the image. I colored the image using Koh-I-Noor woodless color pencils, blending with a stump and Gamsol (OMS).

I distressed a card stock mat, attached three copper brads, glued down a little lasso, and I was off to the rodeo!

Jess so's ya know: things are gonna be a little crazier than normal around here for awhile as I have a houseful of company ... all of whom want to do the Florida-Tourist thing. So far, we're planning on Lion Country Safari (a must-see ... the giraffes alone are worth the price of admission), several beach days (to my favorite super-secret-almost-private-pristine beach), all manner of fishing (Lake Okeechobee, the IntraCoastal and the Gulf Stream), a day with the Loggerhead turtles, another day in Coconut Creek to see what's the haps at Butterfly World, a possible trip to Universal up north in Orlando (just received an amazin' resident package deal ... this one's gonna be hard to resist), a swampy (with all the attendant swamp-like critters), day in the Everglades, and Lord knows what all else! Please pass the All-SPF 120.

And, on top of all of the aforementioned festivities, we're happily celebrating the fact that our 8 year old, heretofore non-fertile banana tree FINALLY set fruit! EIGHT YEARS! We thought we were headed straight for Guinness and the new world record, but the not-so-little lady outfoxed us at the last minute. I swear, we've done everything short of romantic weekends in the Bahama's to get this baby to bear fruit! If anyone's interested, I could post a photo. Lemme know ...

Thanks for a fun challenge Allison; I see a whole new direction for me using wood-burning-tools and hot stamps!! And thank YOU for spending part of your busy day with me!

~Hugs,


Card Stock: Sorbet by CutCard Stock, Kraft by Bazzill; Stamp: Comotion Rubber Stamps; Ink: "Timber Brown" Staz-On; Color Medium: Koh-I-Noor Woodless Colour Pencils; Gamsol by Gamblin; Stumps by Creative Mark; Brads: Unknown; Designer Paper: "Wanted" Collection, Cosmo Cricket; Cork: Karen Foster; Fiber: 7gypsies; Walnut Hollow Creative Versa-Tool; Walnut Hollow Hot Stamps; Electricity: Florida Power & Light :-); Die Cutting Machine by Provo Craft; Die by Provo Craft; Distress Tool: Heidi Swapp; Adhesive: ATG 714; Dimensionals: Black Hexagons (Obtained in a Sticky Swap)

Wednesday, June 4, 2008

15 Minute Project ... and A Black & White + 1 Challenge Entry

Pin It


Hi boys and girls and welcome to the show!

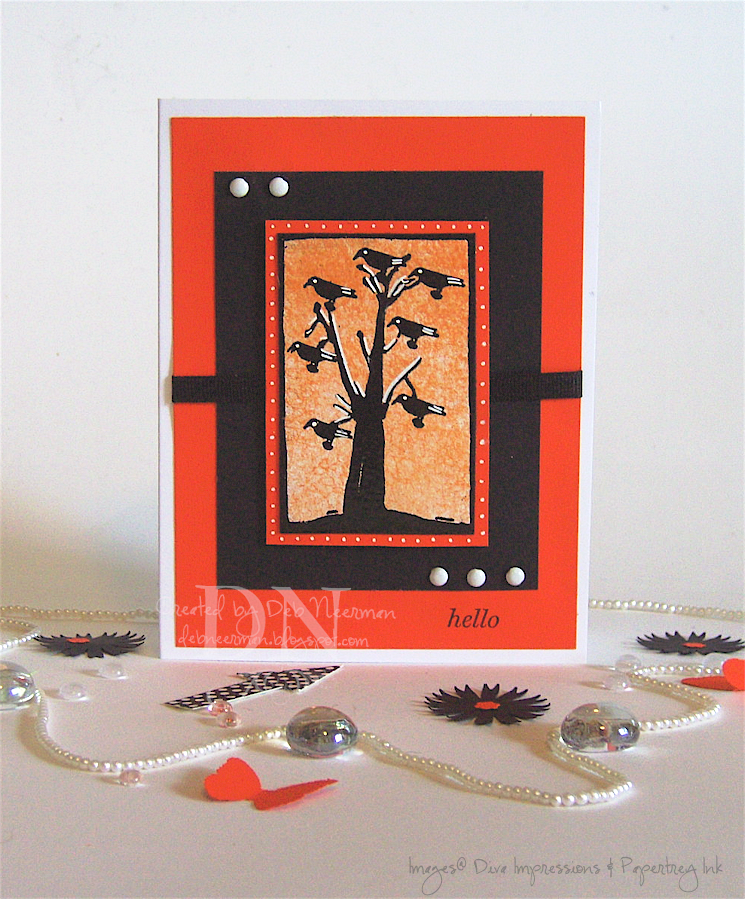
Today's "15 Minute Project" was created for Sharon's "Stamp Simply" blog challenge. This week, Sharon asked that we create a paper project using just three colors: black and white, plus any one of your choice ... including various shades of that color. Umm, obviously, I chose orange!

I loaded my "Tree Full of Crows" stamp with a thick coat of Versamark ... followed by "Black Soot" Distress ink, then stamped on Xerox 110# card stock. Using my heat gun, I embossed using clear embossing powder. This kewl stamp by Diva Impressions, is available HERE.

I added some white highlights to the trees and the crows using a Sharpie Paint Pen ... and used the same pen to add a little dotted border around the focal image.

I sponged some Palette Hybrid orange ink over the stamped image, then wiped the embossed images down with a soft cloth.

I stamped my sentiment, added some white brads, tied a grosgrain ribbon around the mats, and finis! Easy-peasy and ready to serve in just 15 Minutes!

RANT ALERT: Why do my brads always have a ding/indent on 'em? Am I the only one that always ends up with seconds? They look fine (and so stinkin' cute!), in their little plastic box in the store but somewhere between here and there, they get all these awful-lookin' ding-thingies on 'em.

Moving on. This card is going right into my stash; my first official Halloween card of 2008! Seriously, I send out dozens of Halloween cards ... I rarely send Easter cards, occasionally a few Valentine's, but Halloween? Oh, forty five or so!

Thanks so much for sharing part of your busy day with me ... you guys rock!

~Hugs,


Card Stock: Xerox 110#, DCWV; "Tree Full of Crows" Stamp by Diva Impressions; Sentiment by Papertrey Ink; Ink: Versamark Watermark Ink, Distress Ink by Ranger Industries, and Palette Hybrid by Stewart Superior; Color Medium: Sharpie Extra-Fine Point Paint Pen; Clear Embossing Powder, Unknown (I dump all of it into a lidded plastic storage container); Brads: American Crafts; Grosgrain Ribbon: Unknown; Dimensionals: Scotch Foamies; Adhesive: ATG 714

Tuesday, June 3, 2008

I'm a Bad Blogger ... Will You Like Me Again if I Give You Candy, Little Girl?

Pin It

Hey, everyone! So sorry I haven't posted in a couple of days ... the DH and I took a little time off just for the two of us. So, now I'm behind on everything and the hurrier I go, the behinder I get!

Couple of things I wanted to let you know about before announcing the winner of the stamps.

Beth, owner of Diva Impressions, is running a special sale - just for newsletter subscribers. So, scurry on over to Diva Impressions, sign up for her newsletter and receive 25% off ALL stamps! WowZA! This offer will expire on June 15, so hurry!

Also, Beth announced the addition of six new members to her Design Team. They are: Belinda Spiwak, Cindy Cade, Debi Wind, Judy Jackson, Rosemary Rowe, and Elise Hubka! And of course me, LOL. Congrats to all of the new members; I'm looking forward to working with all of you!

And, Beth is seeking magazine submissions. If you want to earn free stamps, just get your artwork published in a major stamping/scrapbooking magazine, (i.e.,: RSM, Somerset, Altered Arts, etc..) and get $30.00 in stamps from Diva Impressions! (Artwork must contain at least 75% Diva Impressions images). You can contact Beth at DivaImpressionsStamps@hotmail.com for more info.

Finally, I hope you all will sign up for the Diva Impressions Yahoo Group. This group is specifically for ideas, tutorials, contests, challenges, etc., using Diva Impressions Rubber Stamps. As things get rolling, there will be chances to win prizes, learn new techniques, get special offers, and find out about special sales for members only. Sign up and be inspired by great some designs from the Design Team and other group members! Please sign up today at: http://groups.yahoo.com/group/divaimpressionsrs/. Oh, and tell Beth that I sent ya!

Okay, on to this week's winner! I went to random.org and got this:

Here are your random numbers: 18
Timestamp: 2008-06-03 22:05:00 UTC

So, comment #18 reads, "#18 - Ack, I missed yesterday! It was too busy a day to blurf - can you believe such a thing? Sooo....you want me to choose 1 stamp? I can't choose just one! There are so many great ones. How about I'll choose one per entry, teehee?! For this one I'll choose floral arch, because I love the silhouette flowers and the shape of the stamp is unique - perfect for all these half-circle sketches we're seeing lately!" This comment was left by Jennifer (scs: Jennifer-g).

Congrats Jennifer! Send me your snail mail addy and these pretty l'il things will be on their way home to you soon!

Thank you all so much for posting to win ... I wish you all could win! But, you know me, I'll be giving more stamps away before you know it!

I'll be back tomorrow with a project or three!

~Hugs,